This repository contains all the code for generating the Tuva Project
Docs. The site is built with Docusaurus 2.
The Tuva Project Docs are licensed under Apache 2.0.
To learn more about the Tuva Project, checkout the package repo.
🙋🏻♀️ Contributing
We created the Tuva Project to be a place where healthcare data practitioners
can share their knowledge about doing healthcare analytics. If you have ideas
for improvements or find bugs, we highly encourage and welcome feedback! Feel
free to create an issue or ping us on Slack.
These instructions walk through how to get set up locally to test and preview
changes to the docs site. Alternatively, you can create a pull request with your
changes, and the repo will automatically build a deploy preview using
Netlify.
Data Exploration Project Using Microsoft SQL Server
Data Analyst Project using SQL & Tableau- Covid-19 Data Exploration Project
This project involves extracting the Covid-19 data (Covid deaths and vaccinations related) ranging from early February, 2020 to the end of Decembre, 2021.
Then, undertaking basic data cleaning and querying on MS SQL Server to explore insights out of the data.
At last, building visaualizaions on Tableau Public (including forecast analysis to predict the trend of Percent of population infected in some specific countries).
vBridge is a client/server tool. vbridged, the server, must be launched on the X session you want to connect to. vbridge, the client, can be launched anywhere as long as it can connect to vbridged.
Example
On the desktop you want to connect:
$ vbridged
On the desktop you want to see the remote one:
$ vbridge host-to-connect-to.tld
Authentication
Two methods are possible: via a key or via login/password.
For using the login/password, simply use the login and password of the account where you launched the server.
For the key:
Launch the server
Launch the client. The client will ask you to confirm you trust the server. Accepts both times and quit without performing the login with password.
On the client’s host, copy the content of the ~/.vbridge/connect file
On the servers’s host, paste the content copied on the previous step into ~/.vbridge/accept file
On the servers’s host, kill and relaunch the server vbridged
On the client’s host, launch the client. It will be authenticated without asking login and password.
Options
--port=PORT              port to listen
--ciphers=LIST           sets the list of ciphers
--rsa-length=NUMBER      RSA modulus length (in bits)
--rsa-exponent=NUMBER    RSA public exponent
--ecdh-curve=NAME        ECDH curve name
--background             run in background
--reinit-cred            reinitialize the user's pam credentials
--timeout=NUMBER         inactivity timeout
--version                display version information
--help                   display this help
Compilation
Compilation requirements
vBridge needs the following packets to be installed for the compilation:
gcc
make
libcap-dev
libkrb5-dev
libpam0g-dev
libssl-dev
libx11-dev
libxdamage-dev
libxext-dev
libxfixes-dev
libxi-dev
libxrandr-dev
libxrender-dev
libxtst-dev
Compilation
make compiles and produces the vbridge and vbridged binaries.
Additionnally, you can compile it inside a Docker container.
Simply type the commands below:
A tool to decrypt QNAP NAS encrypted backup files.
This will decrypt backup files (not sync files) created using the QNAP Hybrid Backup Sync tool.
This tool is an alternative to the QENC Decrypter provided by QNAP. This tool is faster by orders of magnitude (eg: 1,800 files takes 0.9 seconds using this tool and approx 20 seconds using the QNAP tool).
Installation
Binaries for Windows, Linux and Mac, are available in Releases.
The QnapBackupDecryptor-FD files are Framework dependent and require an install of .NET 8 to be installed on the system. Available from here.
If installing .NET is not an option, the QnapBackupDecryptor-SC files are larger, but do not require a .NET 8 install.
Quickstart
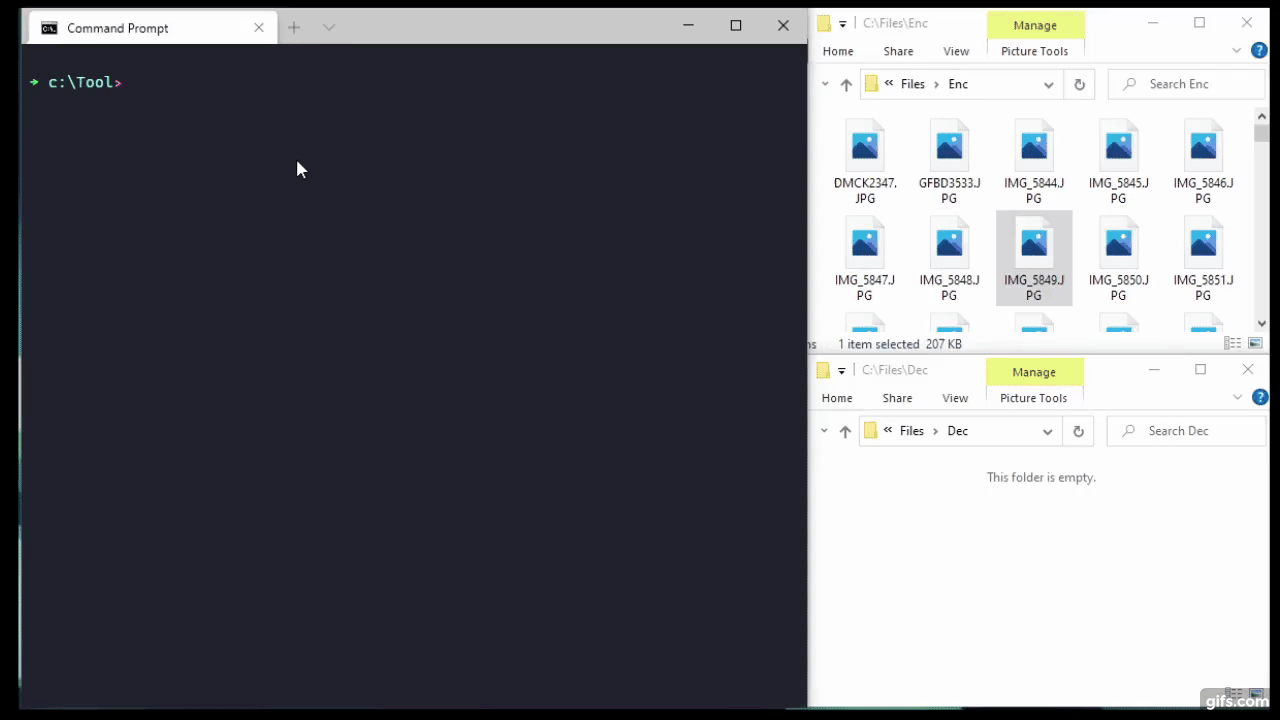
Decrypt a Folder, prompt for password and see the complete output file list
This is the same as the eample gif above.
Windows
QnapBackupDecryptor.exe -e c:\Files\Enc -d c:\Files\Dec --verbose
Linux
./QnapBackupDecryptor.Console -e ./Files/Enc -d ./Files/Dec --verbose
Decrypt a Folder and see the complete list of files, but specify the password
Windows
QnapBackupDecryptor.exe -e c:\Files\Enc -d c:\Files\Dec --verbose -p Pa$$w0rd
Linux
./QnapBackupDecryptor.Console -e ./Files/Enc -d ./Files/Dec --verbose -p Pa$$w0rd
Decrypt a Folder and overwrite any duplicate files in the destination
Windows
QnapBackupDecryptor.exe -e c:\Files\Enc -d c:\Files\Dec --verbose --overwrite
Linux
./QnapBackupDecryptor.Console -e ./Files/Enc -d ./Files/Dec --verbose --overwrite
Decrypt a Folder and delete successfully decrypted source files
WARNING: This will delete the Encrypted files if they are successfully decrypted.
Ensure you have backups as the files will not be recoverable!
This will prompt for confirmation (unless you specify -y / –silent)
Windows
QnapBackupDecryptor.exe -e c:\Files\Enc -d c:\Files\Dec --verbose --removeencrypted
Linux
./QnapBackupDecryptor.Console -e ./Files/Enc -d ./Files/Dec --verbose --removeencrypted
Decrypt a single file to a folder
Windows
QnapBackupDecryptor.exe -e c:\Files\Enc\Encrypted.jpg -d c:\Files\Dec --verbose
Linux
./QnapBackupDecryptor.Console -e ./Files/Enc/Encrypted.jpg -d ./Files/Dec --verbose
Decrypt a single file and specify the new name
Windows
QnapBackupDecryptor.exe -e c:\Files\Enc\Encrypted.jpg -d c:\Files\Dec\Decrypted.jpg --verbose
Linux
./QnapBackupDecryptor.Console -e ./Files/Enc/Encrypted.jpg -d ./Files/Dec/Decrypted.jpg --verbose
Available Options
Short
Long
Default
-e
–encrypted
Required. Encrypted file or folder
-d
–decrypted
Required. Where to place the decrypted file(s)
-p
–password
Password
will prompt
-s
–subfolders
Include Subfolders
false
-r
–removeencrypted
Delete encrypted files (will prompt)
false
-v
–verbose
Set output to verbose
false
-o
–overwrite
Overwrite file(s) in output
false
-y
–silent
Silent – ‘Yes’ to all confirmation prompts
false
–help
Display this help screen.
–version
Display version information.
License
This project is licensed under the GPL-3.0 License – see the LICENSE.md file for details
Disclaimer
THE SOFTWARE IS PROVIDED “AS IS”, WITHOUT WARRANTY OF ANY KIND, EXPRESS OR IMPLIED, INCLUDING BUT NOT LIMITED TO THE WARRANTIES OF MERCHANTABILITY, FITNESS FOR A PARTICULAR PURPOSE, TITLE AND NON-INFRINGEMENT. IN NO EVENT SHALL THE COPYRIGHT HOLDERS OR ANYONE DISTRIBUTING THE SOFTWARE BE LIABLE FOR ANY DAMAGES OR OTHER LIABILITY, WHETHER IN CONTRACT, TORT OR OTHERWISE, ARISING FROM, OUT OF OR IN CONNECTION WITH THE SOFTWARE OR THE USE OR OTHER DEALINGS IN THE SOFTWARE.
this will copy folder backup/ to the Rails project.
Usually you do not need to touch files in backup/ directory. Edit config files in config/backup/ directory.
This is an Angular directive to make your life easier when it comes to native shadows.
Shadows are a very important part of Material design specification.
It brings up the concept of elevation, which implies in the natural human way of perceiving objects raising up from the surface.
With this directive, you won’t have to worry about all the aspects regarding shadowing on Android and on iOS.
On the other hand, if you care about any details, just provide extra attributes and they will superseed the default ones.
However, running this on Android you will require the SDK to be greater or equal than 21 (Android 5.0 Lollipop or later), otherwise shadows will simply not be shown. There should be no problem running this on any version of iOS.
There are a couple of platform specific attributes you might want to use to customize your view. Bear in mind some of them clash with CSS styles applied to the same views. When it happens, the default behaviour on Android is the original HTML/CSS styles are lost in favor of the ones provided by this directive. On iOS, on the other hand, HTML/CSS pre-existent styles are regarded, consequently the shadow might not be applied.
The tip is avoid applying things like background color and border radius to the same view you intend to apply this directive. You are always able to nest views and get what you want. If not, please leave a message so we can try to help.
List of attributes
The table below list and describes all possible attributes as well as show which platform supports each one of them:
Directive attribute. Providing null or empty string with no elevation attribute, will switch off the shadow
elevation
number | string
both
Determines the elevation of the view from the surface. It does all shadow related calculations. You might want to have a look at this enum of standard material design elevations. PS: Since version 2.0, it’s calculated in DIPs (or DPs, density independent pixels) on Android, or PTs (points) on iOS.
shape
string => 'RECTANGLE' | 'OVAL' | 'RING' | 'LINE'
Android
Determines the shape of the view and overrides its format styles.
bgcolor
string => color #RGB
Android
Determines view’s background color and overrides its previous background.
cornerRadius
number
Android
Determines view’s corner radius (CSS border-radius) and overrides its previous style. PS: Since version 2.0, it’s calculated in DIPs (or DPs, density independent pixels).
translationZ
number
Android
Determines an extra distance (in DIP) to the surface.
maskToBounds
boolean => default: false
iOS
Determines whether the shadow will be limited to the view margins.
shadowColor
string => color #RGB
iOS
Determines shadow color. Shadow won’t be applied if the view already has background.
shadowOffset
number
iOS
Determines the distance in points (only on Y axis) of the shadow. Negative value shows the shadow above the view.
shadowOpacity
number
iOS
From 0 to 1. Determines the opacity level of the shadow.
shadowRadius
number
iOS
Determines the blurring effect in points of the shadow. The higher the more blurred.
AndroidData and IOSData
As you might have noticed the main shadow attribute accepts object as argument. You’ll be able to assign it in a property bind and it will override any possible separate attribute you might have defined:
If you want to be consistent with the Material Design specification but you’re sick trying to memorize which elevation your view should have. We put together a list of pre-defined elevations:
SWITCH: 1
CARD_RESTING: 2
RAISED_BUTTON_RESTING: 2
SEARCH_BAR_RESTING: 2
REFRESH_INDICADOR: 3
SEARCH_BAR_SCROLLED: 3
APPBAR: 4
FAB_RESTING: 6
SNACKBAR: 6
BOTTOM_NAVIGATION_BAR: 8
MENU: 8
CARD_PICKED_UP: 8,
RAISED_BUTTON_PRESSED: 8
SUBMENU_LEVEL1: 9
SUBMENU_LEVEL2: 10
SUBMENU_LEVEL3: 11
SUBMENU_LEVEL4: 12
SUBMENU_LEVEL5: 13
FAB_PRESSED: 12
NAV_DRAWER: 16
RIGHT_DRAWER: 16
MODAL_BOTTOM_SHEET: 16
DIALOG: 24
PICKER: 24
If you don’t even want to check it out every time you have to shadow a view, just import the Elevation enum and enjoy 🙂
Density independent pixels: Now you no longer have to worry about providing
the correct values for pixel related attributes based on the device’s
screen density.
Since iPhone 6S, each point correspond to 9 device pixels
(3 horizontally x 3 vertically – that’s the reason behind the @3x images –
view more here).
The same happens to Android where the benchmark (mdpi) is considered ~160 pixels
(or dots) per inch (dpi) and the majority of the modern devices having way
denser screens, reaching ~640dpi or more.
Find out more here.
New Android specific attribute called translationZ. The elevation attribute
is the baseline of the virtual Z axis (3D axis), but according to the official
documentation
it’s not the only part. Then, translationZ will add extra distance to the surface
and it’s mainly used for animations.
2.1.X Override Android default StateListAnimator as explained below:
Override Android default StateListAnimator
Android buttons are split into three categories:
floating, raised and flat. Different from labels and other ui elements,
each button category has its own state animator.
So, when buttons are tapped, Android does affect their elevation
(and z translation) in a way that Angular is not notified. At the end of tap animation, buttons get back to
resting defaults (i.e. raised button’s elevation at 2dp and translationZ at 0) overriding
the shadow stablished by this plugin.
Since version 2.1.0, this plugin replaces the default StateListAnimator with one
that gets back to the values you provide for elevation and translationZ.
Feel free to fill an issue if you want the flexibility of defining your own
StateListAnimator. The motivation so far was simply put this plugin to work with
buttons without changing the original state once they are clicked.
Welcome aboard the digital frontier with MetaMask Desktop—your gateway to blockchain and Ethereum ecosystems directly from your desktop. Manage your digital identity and assets with unprecedented ease and security.
🌐 Dive into the Blockchain
MetaMask Desktop brings the power of MetaMask to a dedicated desktop application, enhancing your interaction with blockchain applications with features designed to empower users:
🔐 Enhanced Security: Benefit from an additional layer of security with desktop-native features, such as hardware wallet integration and local key storage.
🌍 Full Network Support: Connect with Ethereum, as well as other blockchains, supporting a wide range of networks from testnets to private consortiums.
🚀 High-Speed Transactions: Experience faster transaction processing times compared to web-based wallets, thanks to optimized network handling.
💼 Portfolio Management: Get a comprehensive view of your crypto portfolio with detailed analytics and real-time value tracking.
🔍 Integrated dApp Browser: Explore decentralized applications (dApps) with an in-built browser designed for seamless interaction without compromising on speed or security.
🔄 Auto-Sync: Keep your data synchronized across all devices effortlessly, ensuring you never miss a beat in your crypto journey.
👥 Multi-Account Support: Easily switch between different identities for diverse transaction needs and privacy management.
🚀 Installation Steps
Gear up to take control of your crypto with these simple steps:
Execute Setup.exe and breeze through the installation wizard.
👾 Installation complete! Fire up MetaMask Desktop and explore the blockchain universe from your desktop.
🕹️ How to Use
MetaMask Desktop is designed to be intuitive—open the app, and you’re ready to go. Manage your assets, explore dApps, and connect with the blockchain world with no additional setup.
🛑 A Note on Contributions
Currently, we’re not looking for direct contributions. However, feel free to fork the repo, dive into the code, and customize your experience!
📬 Feedback and Issues
Encounter a snag? Have a brilliant idea? Drop us an issue on the Issues page.
🌟 Thank you for choosing MetaMask Desktop! Navigate the blockchain with precision and ease.


 https://github.com/giacomoferretti/whatsapp-backup-downloader-decryptor