This is a different package manager used for reduced disk space when installing below packages. This is optional, the builtin npm will work too with below commands, Just replace pnpm with npm
these will not run the React App because they look for the index.html in the missing directory dist that is created and updated by running pnpm run buildeach time you edit the React App to run the most recent version.
To avoid running the build command each time, access the React App from the frontend server below.
This repository provides a simple LaTeX template for writing responses to
reviewers, which is typically needed when submitting an article to a scientific
journal.
The following commands are provided by the package.
If you are using TeXstudio, there exists an
autocomplete file (.cwl) for the reviewresponse.cls package, which can be
found here.
Document Metadata
You can use the following commands to specify the metadata of the submitted
document.
Place these commands before \begin{document}.
\title{Title of the Manuscript}
\author{Author One\affil{1}, Author Two\affil{1,*} and Author Three\affil{2}}
\affiliation{
\affil{1} Affiliation 1\\\affil{2} Affiliation 2
}
\journal{Name of the Journal}
\manuscript{ID-of-the-Manuscript}
\editorname{Name of the Editor}
Editor and Reviewers
\editor\reviewer
These commands start a new editor and reviewer.
The typical usage is
\begin{document}
...
\editor
Response to the editor

\reviewer
Response to the first reviewer

\reviewer
Response to the second reviewer
Comments and Responses
\begin{generalcomment}
...
\end{generalcomment}
The generalcomment environment is meant for general comments given by the
editor and reviewers.
\begin{revcomment}
...
\end{revcomment}
The revcomment environment is meant for the individual comments made by the
reviewers.
They are automatically numbered.
It also accepts optional arguments, which are directly passed to the underlying
tcolorbox environment.
This is useful, if you want to add some arguments in specific situations, e.g.,
the breakable keyword for very long comments.
The revresponse environment is meant for responses to the individual comments
of the reviewers and editor.
The optional parameter changes the text on the first line.
By default, this text is “Thank you for the comment.”.
The concludingresponse environment is meant for the final response to the editor or reviewer.
The optional parameter changes the text in the header of the tcolorbox environment.
By default, this text is “Concluding Response”; the value of the optional parameter is added to this text.
\begin{concludingresponse}[to the Editor]
...
\end{concludingresponse}
Changes
\begin{changes}
...
\end{changes}
The changes environment is meant for indicating changes that you made to your
manuscript.
It sets the content in a box in order to highlight it for the reviewers.
Bibliography
The reviewresponse package supports the use of biblatex for references.
Simply include biblatex and use the \cite command in your response.
If you want to print specific references, e.g., at the end of the response to
one particular comment, you can use the \printpartbibliography command.
\printpartbibliography{bibkey1,bibkey2,...}
Customization
You can customize the appearance of all the boxes in the reviewresponse.sty
file.
If you only want to change the colors of the boxes, you need to redefine the
following colors.
The shown values are the defaults.
\definecolor{colorcommentfg}{RGB}{0,63,87} % color of the title in the comment box\definecolor{colorcommentbg}{HTML}{e0f0f6} % color of the background of the comment box\definecolor{colorcommentframe}{RGB}{0,112,155} % color of the frame of the comment box\colorlet{colorchangebg}{black!2} % color of the background of the changes box\colorlet{colorchangeframe}{black!20} % color of the frame of the changes box\colorlet{colorconcludingresponsefg}{black!80} % color of the title in the concluding response box\colorlet{colorconcludingresponsebg}{black!2} % color of the background of the concluding response box\colorlet{colorconcludingresponseframe}{black!20} % color of the frame of the concluding response box
Contribute
Thank you for considering contributing to this project.
You should be able to find all the information you need at
CONTRIBUTING.md.
{"DataEventRecordId":0,"Name":"Funny data more","Description":"no","Timestamp":"2015-12-27T08:31:35Z","SourceInfo":{"SourceInfoId":0,"Name":"Beauty","Description":"first Source","Timestamp":"2015-12-23T08:31:35+01:00",},"SourceInfoId":0}
or if a SourceInfo exists
{"DataEventRecordId":0,"Name":"Funny data more","Description":"no","Timestamp":"2015-12-27T08:31:35Z","SourceInfoId":1}
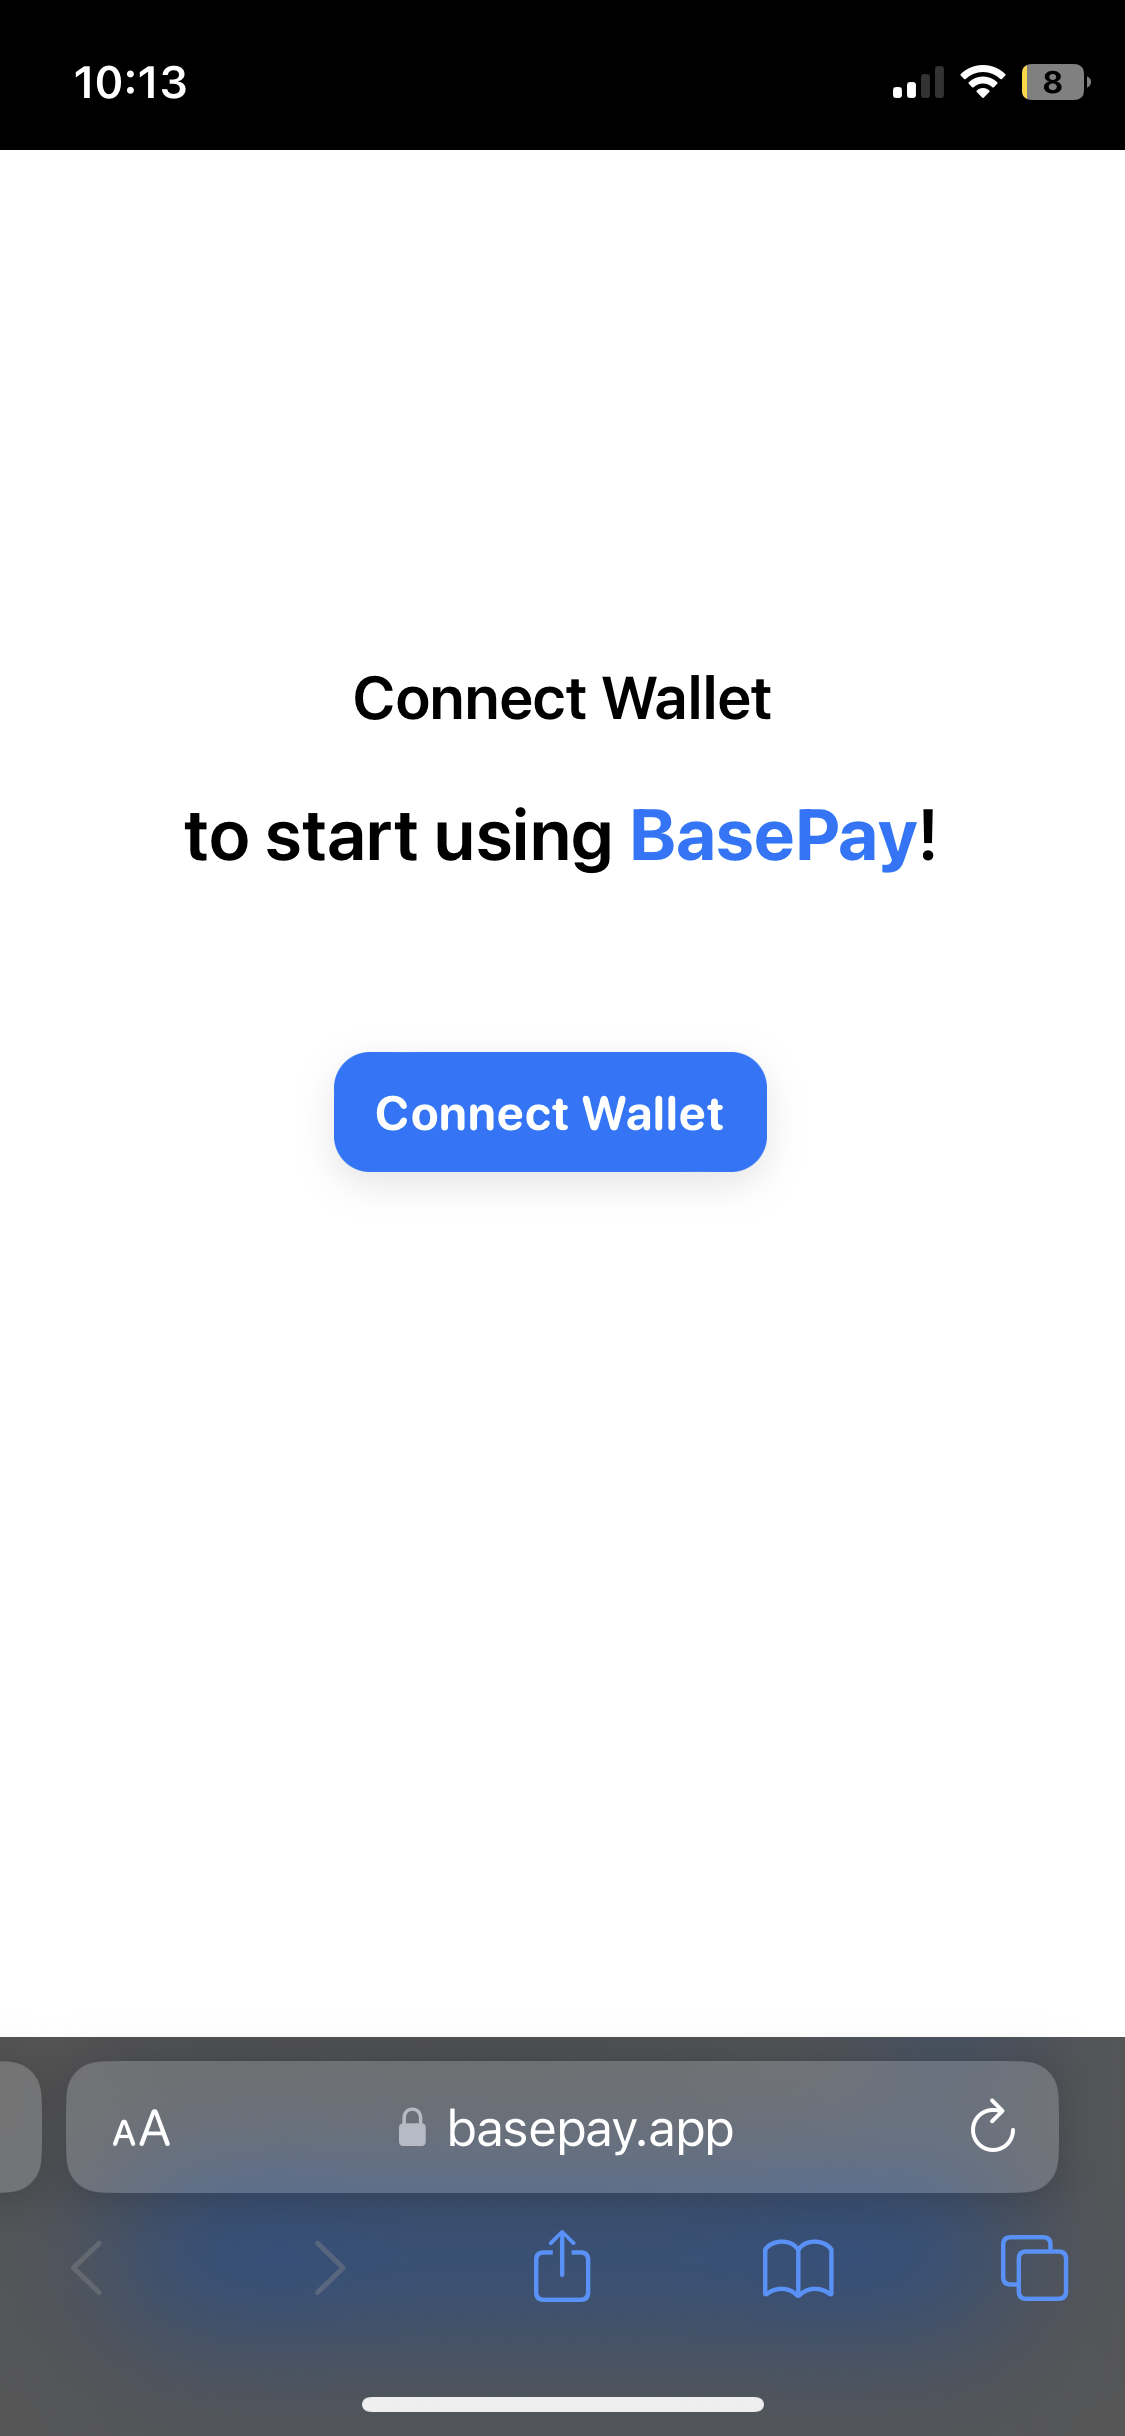
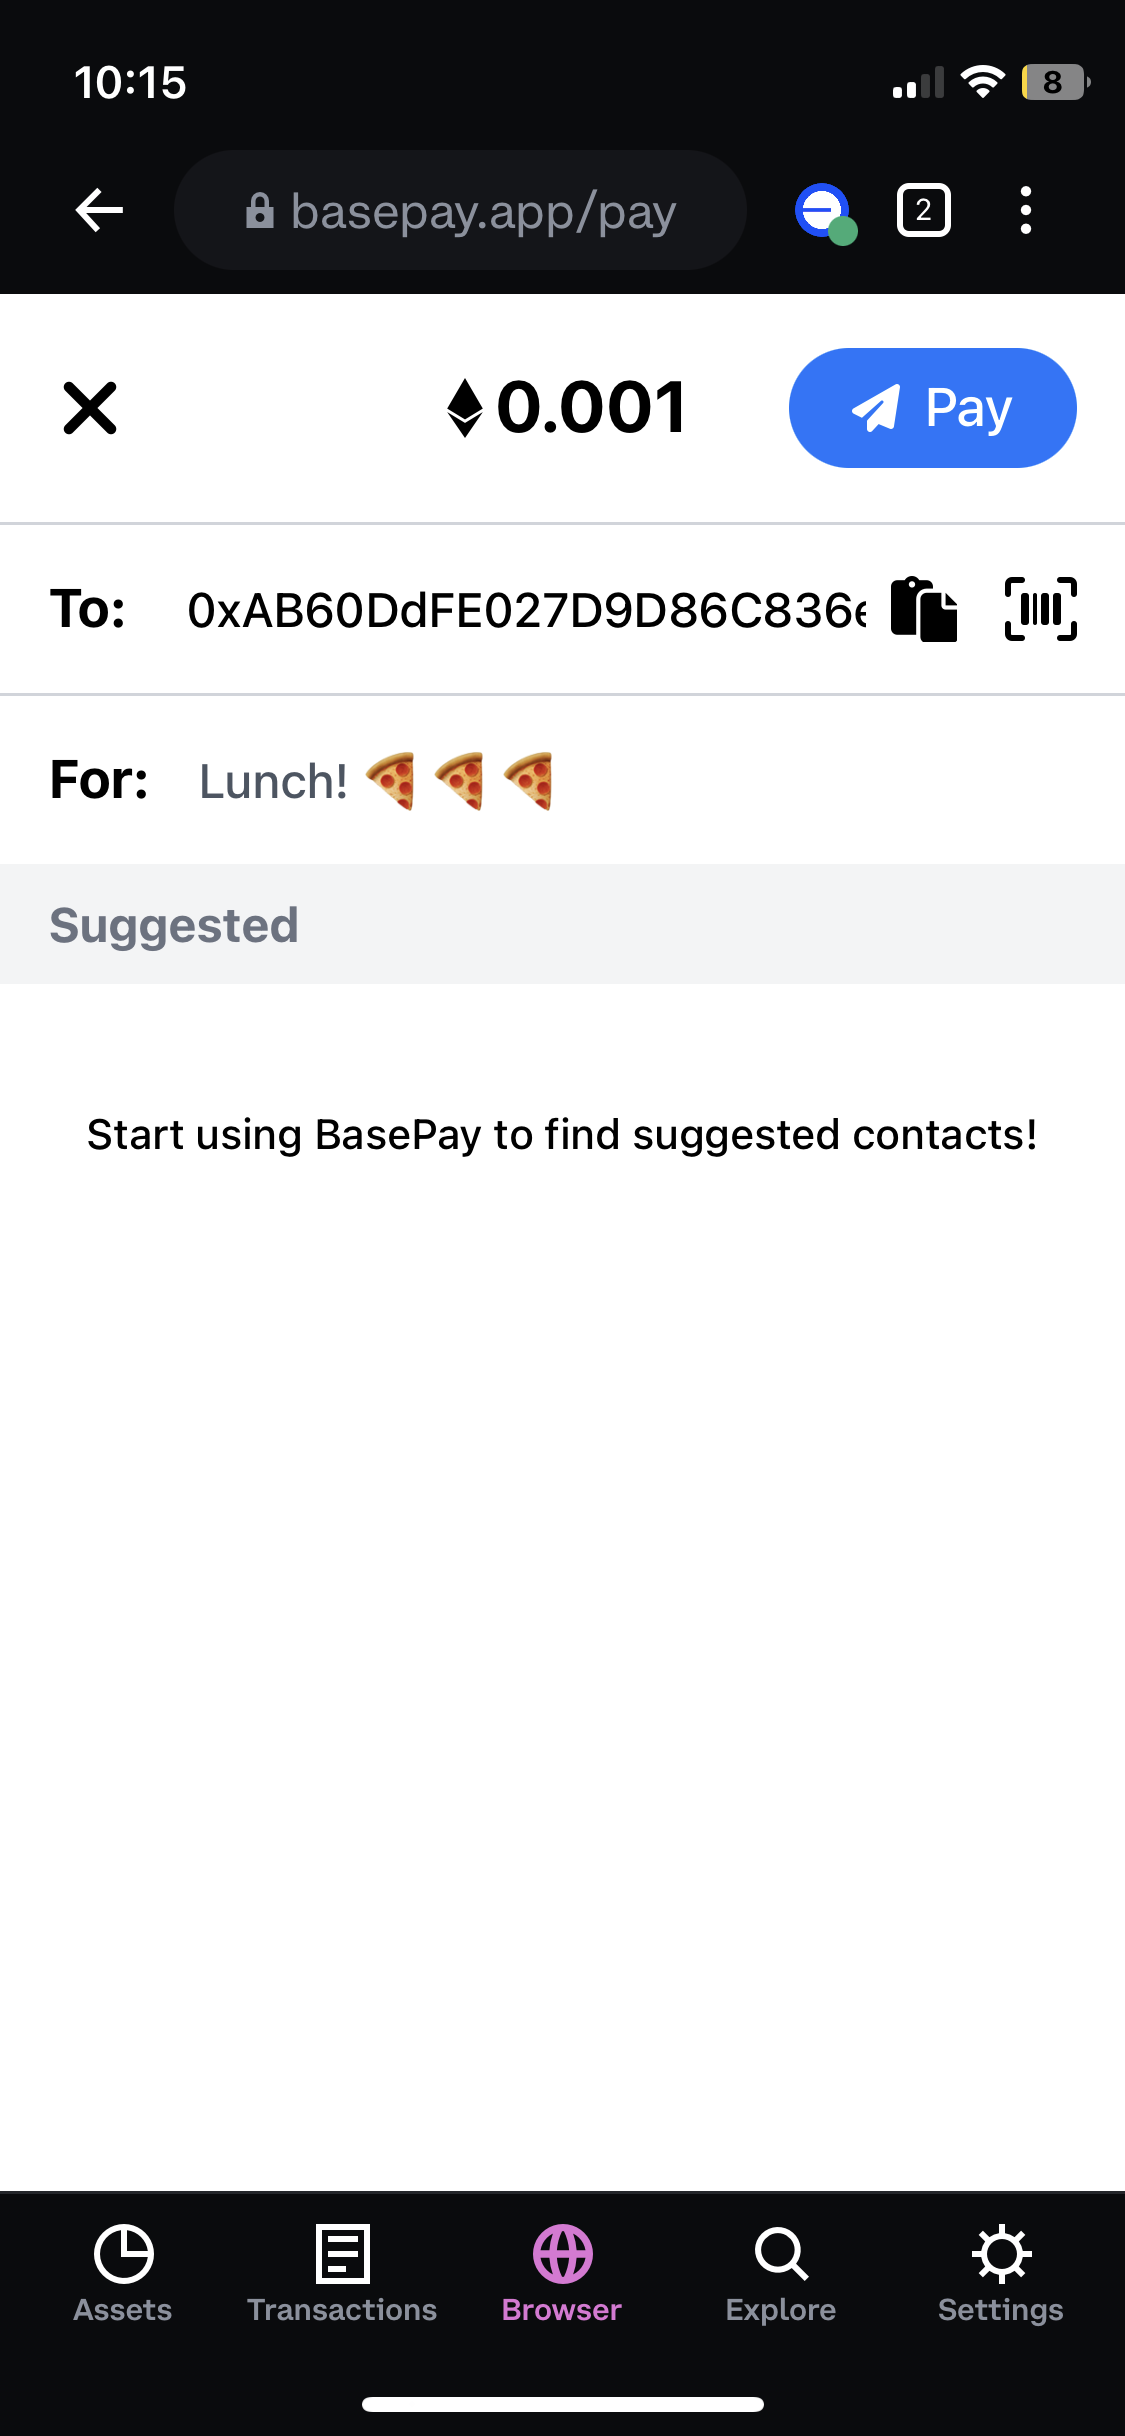
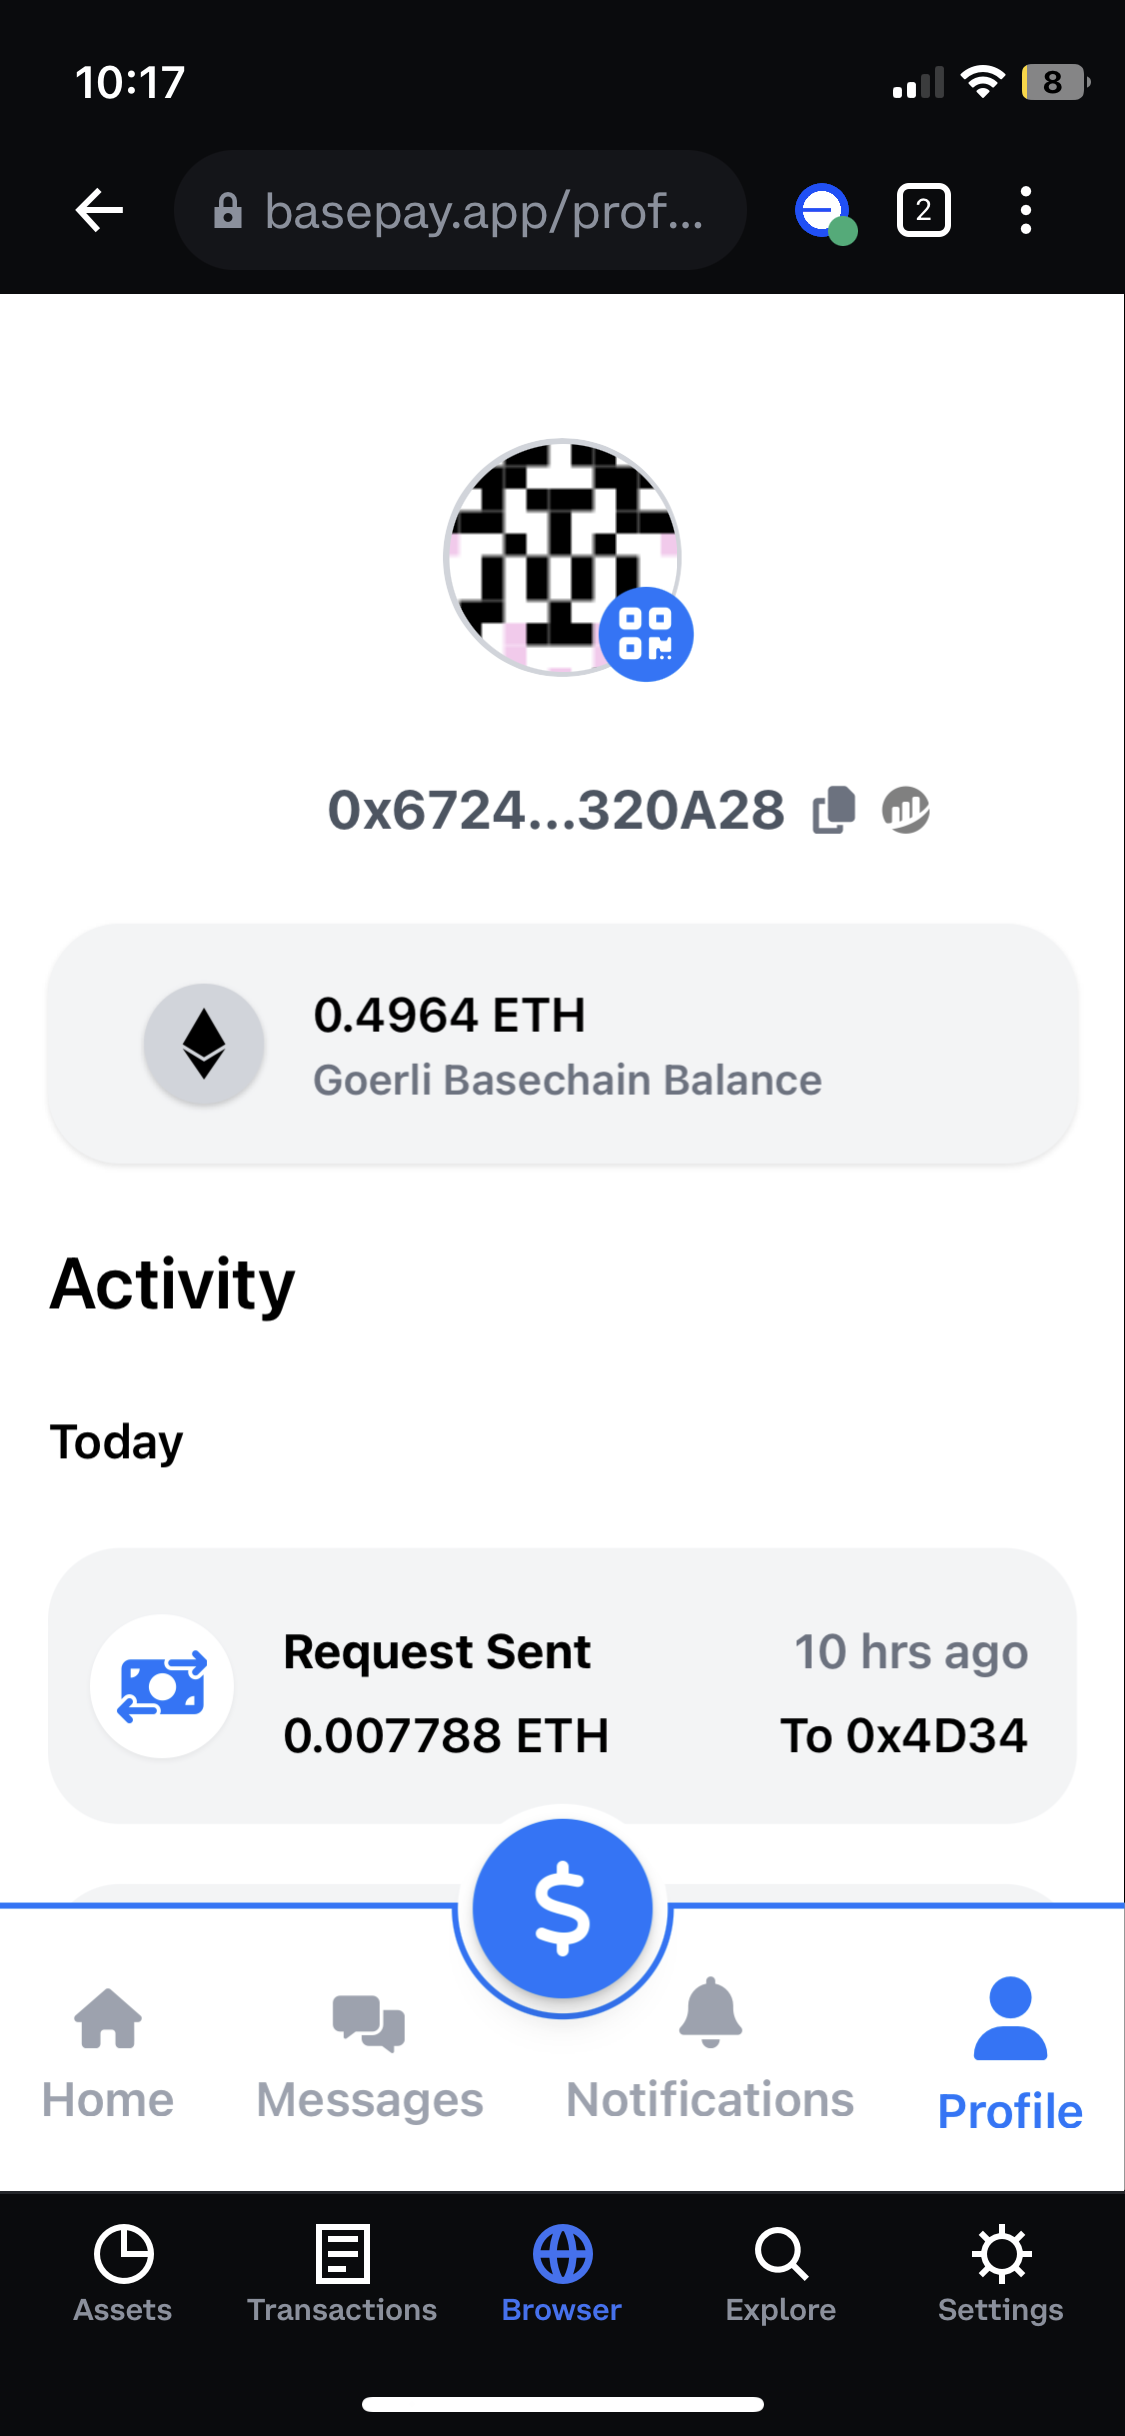
Whether you’re organizing a vacation or sharing lunch expenses, BasePay streamlines payments for all social situations, ensuring they’re more convenient than before.
Features
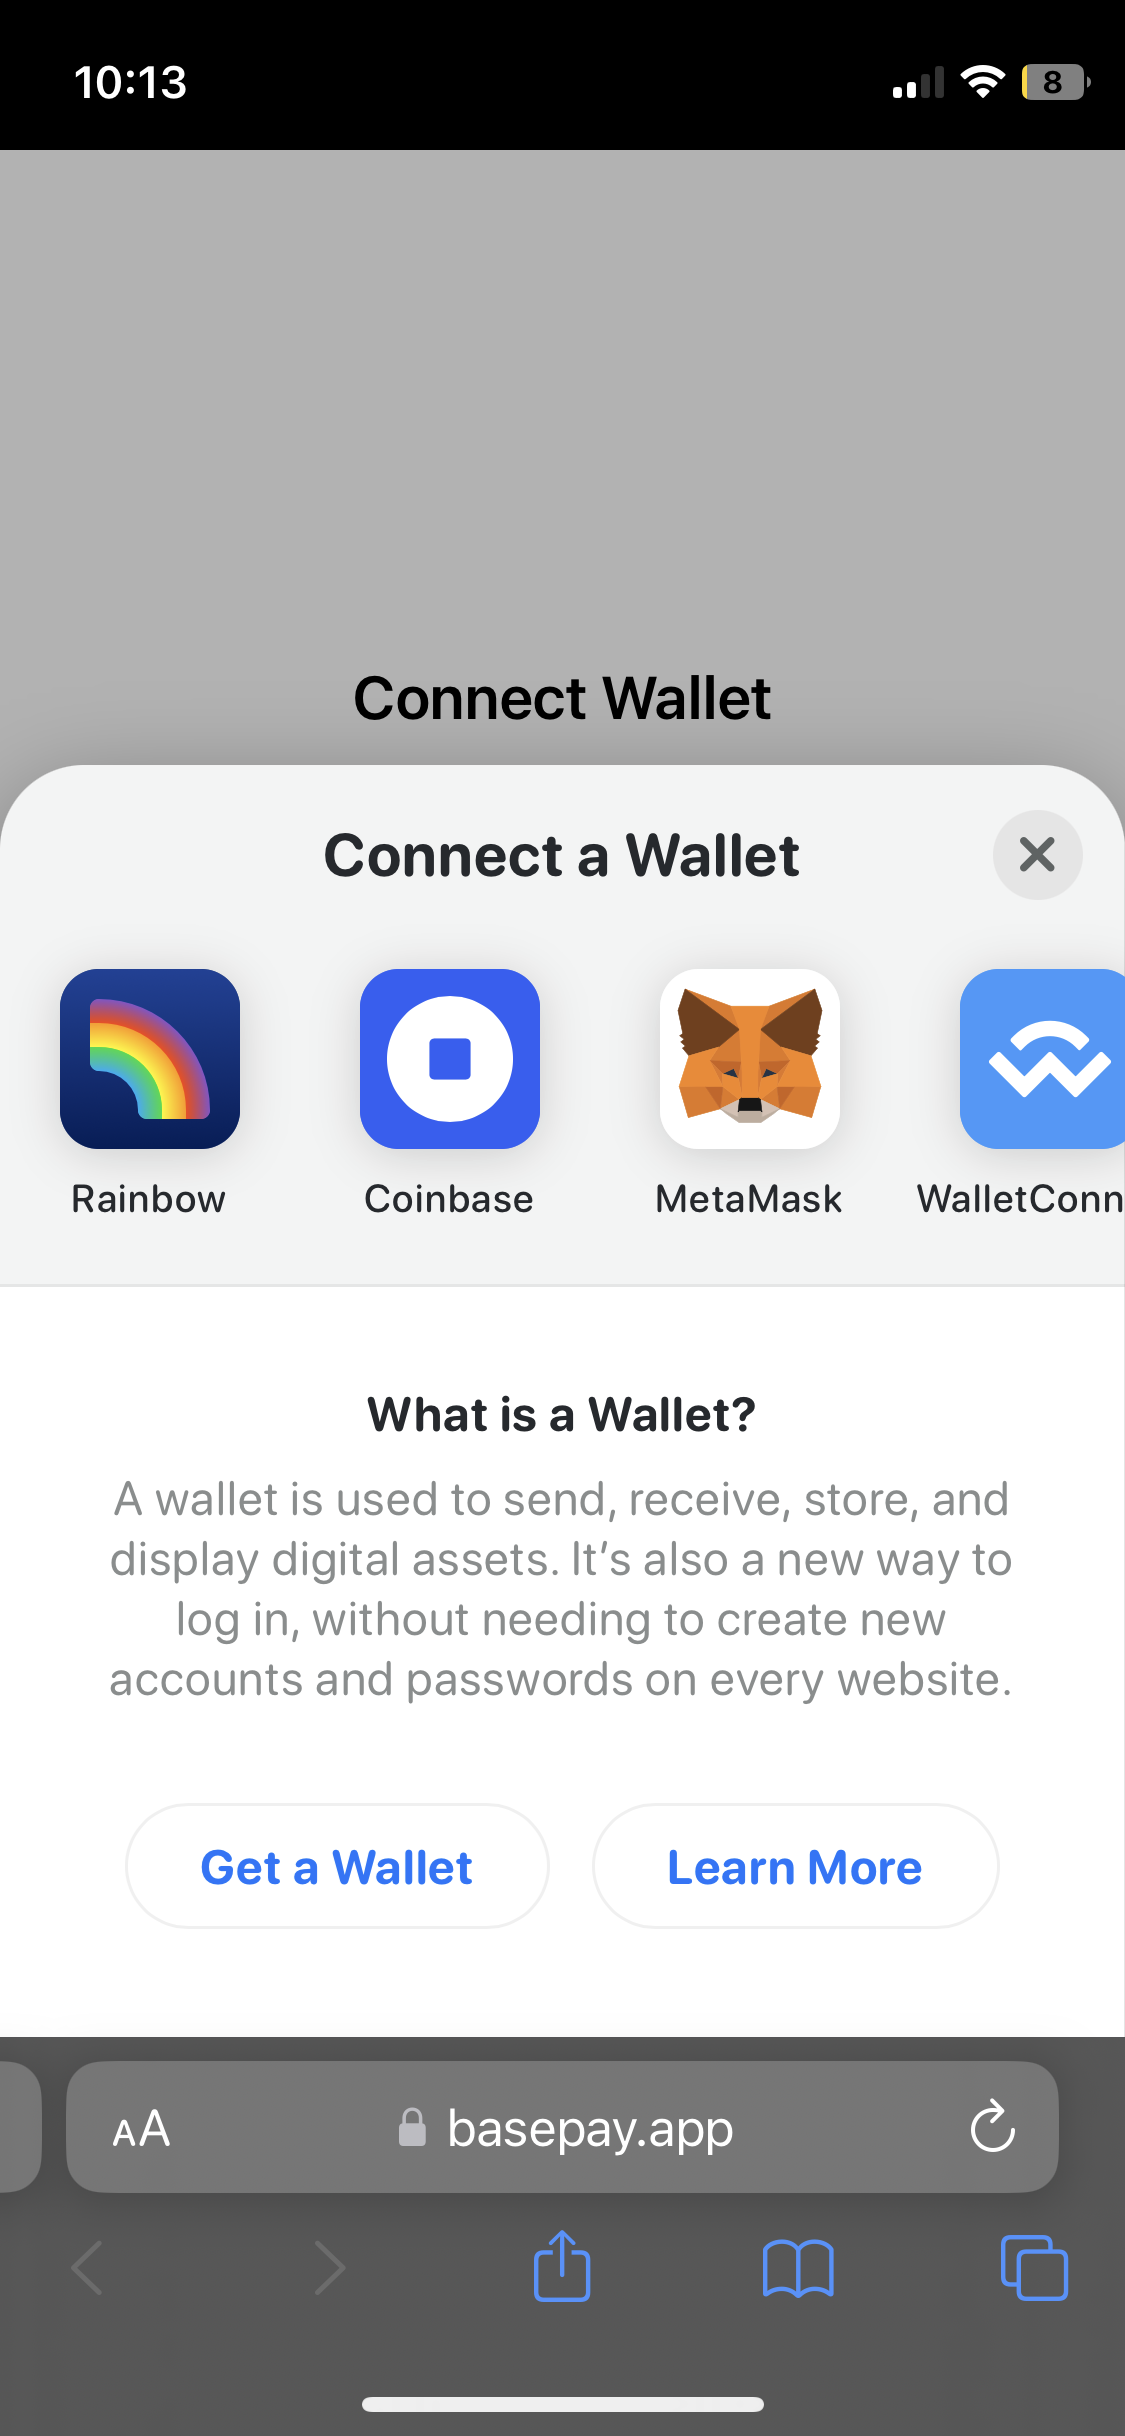
🔹 Connecting User’s Crypto Wallet: Users can connect their crypto wallets, including Coinbase Wallet and Metamask.
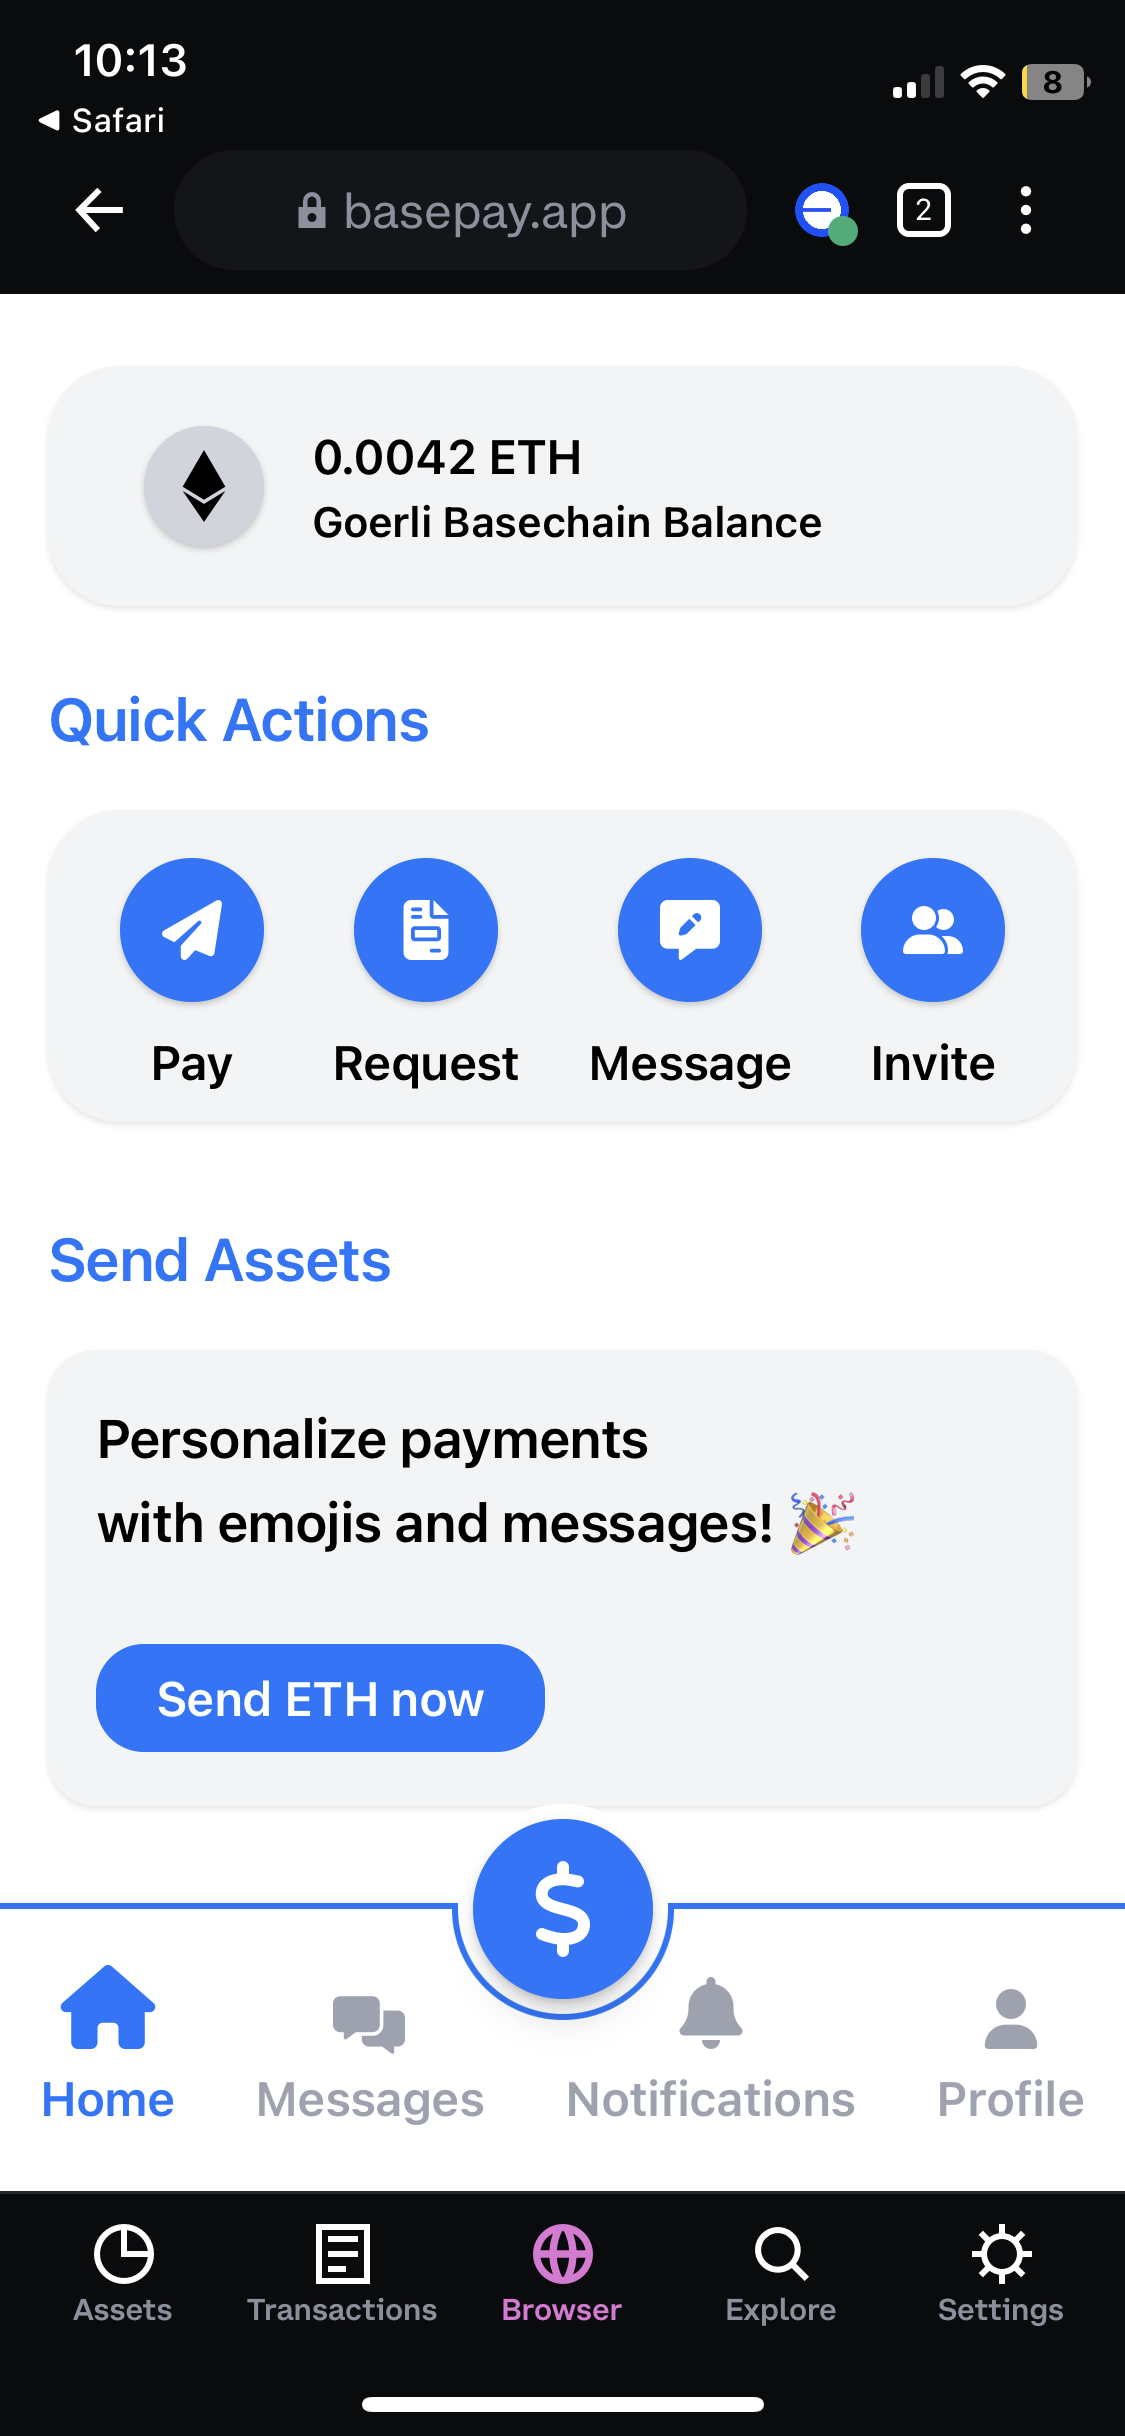
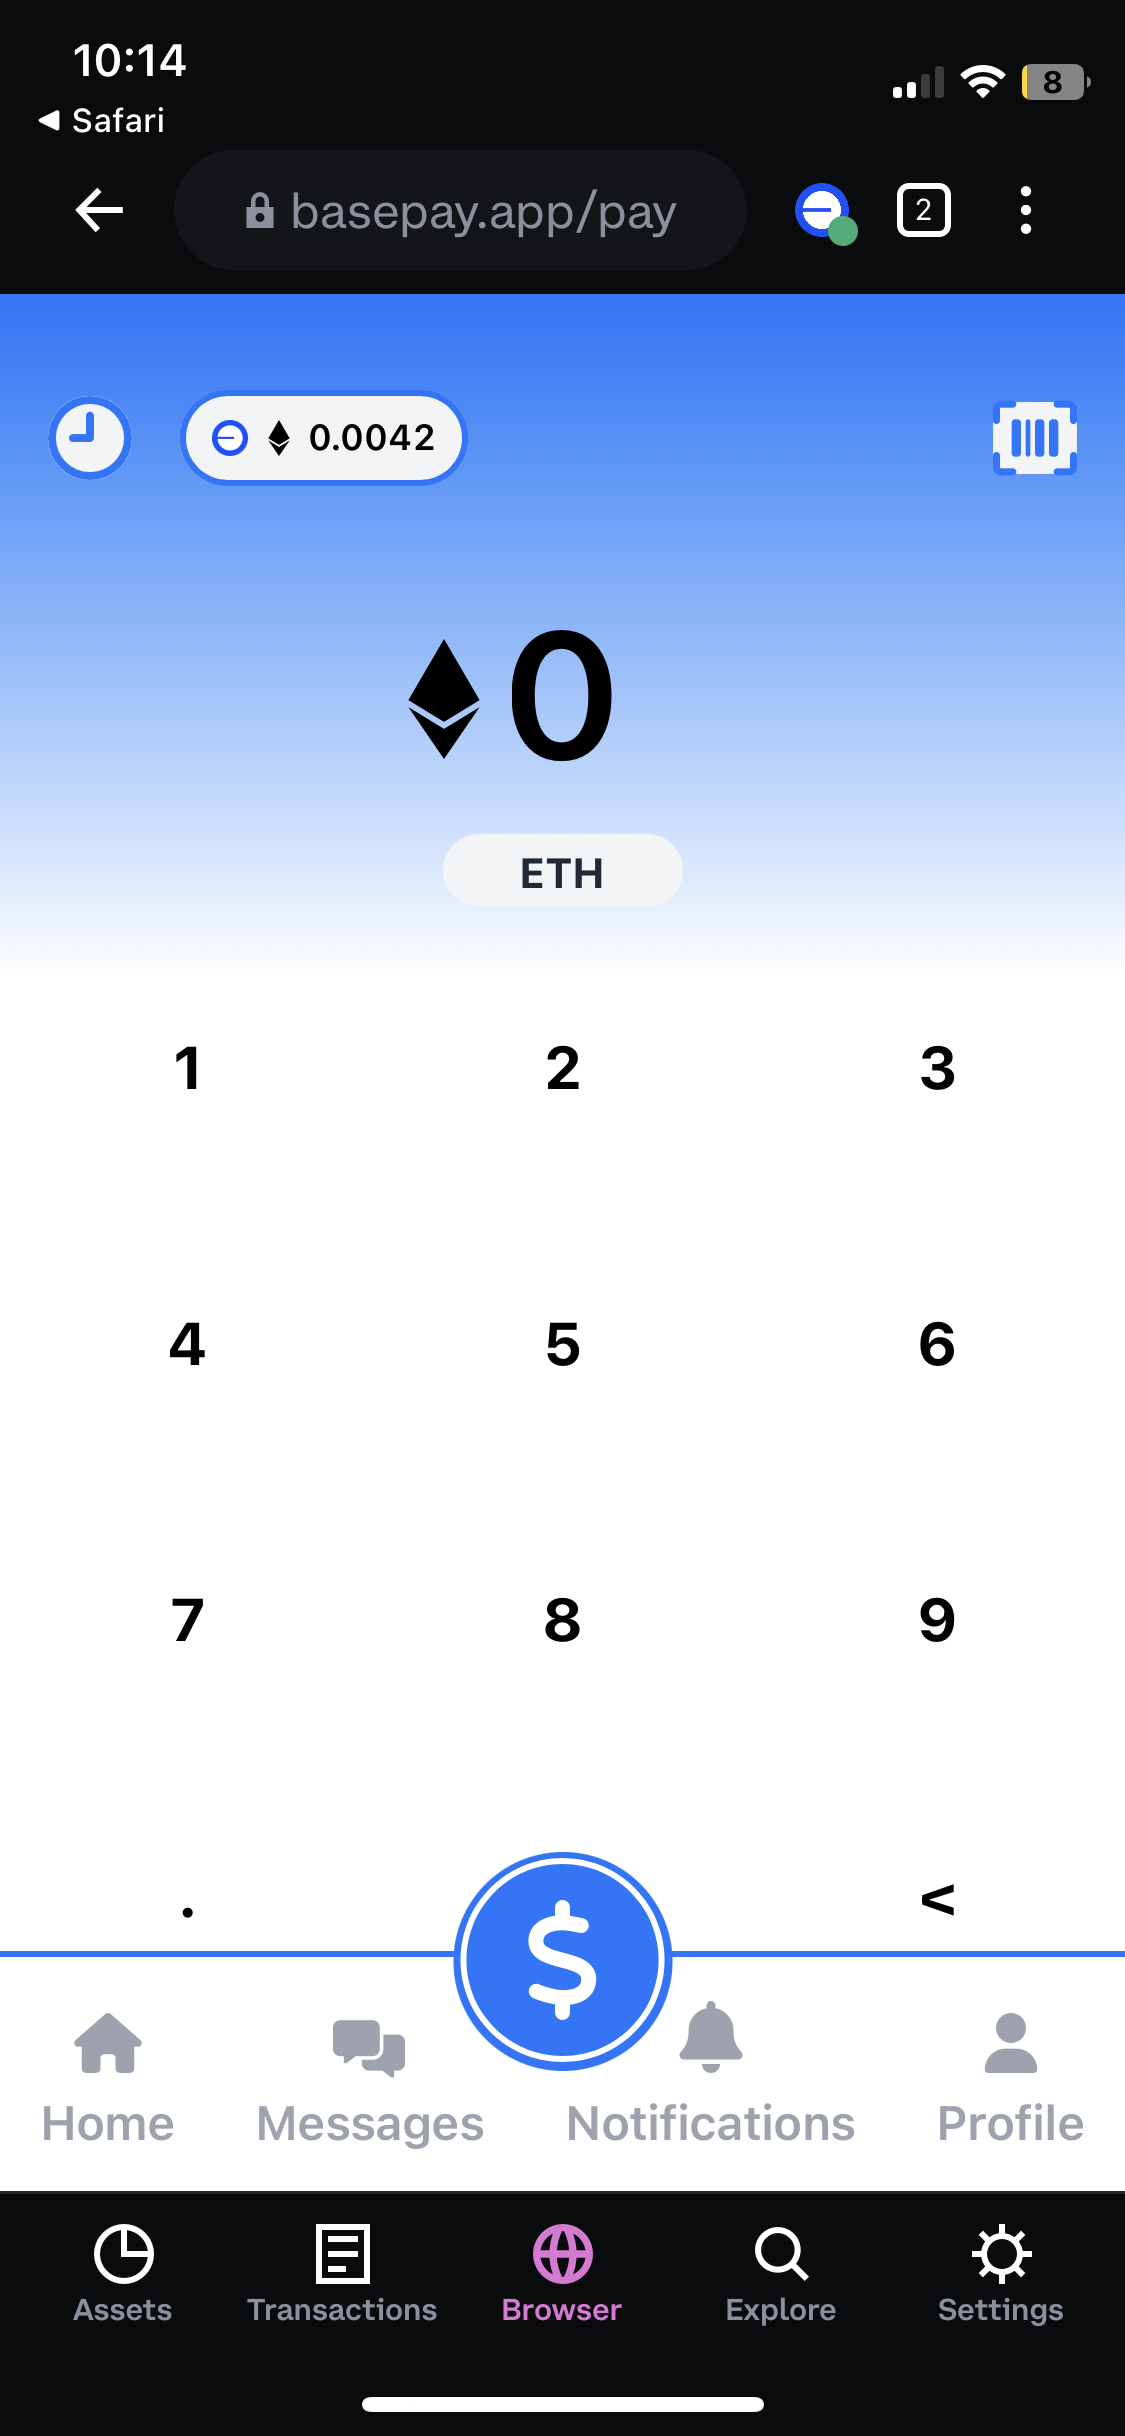
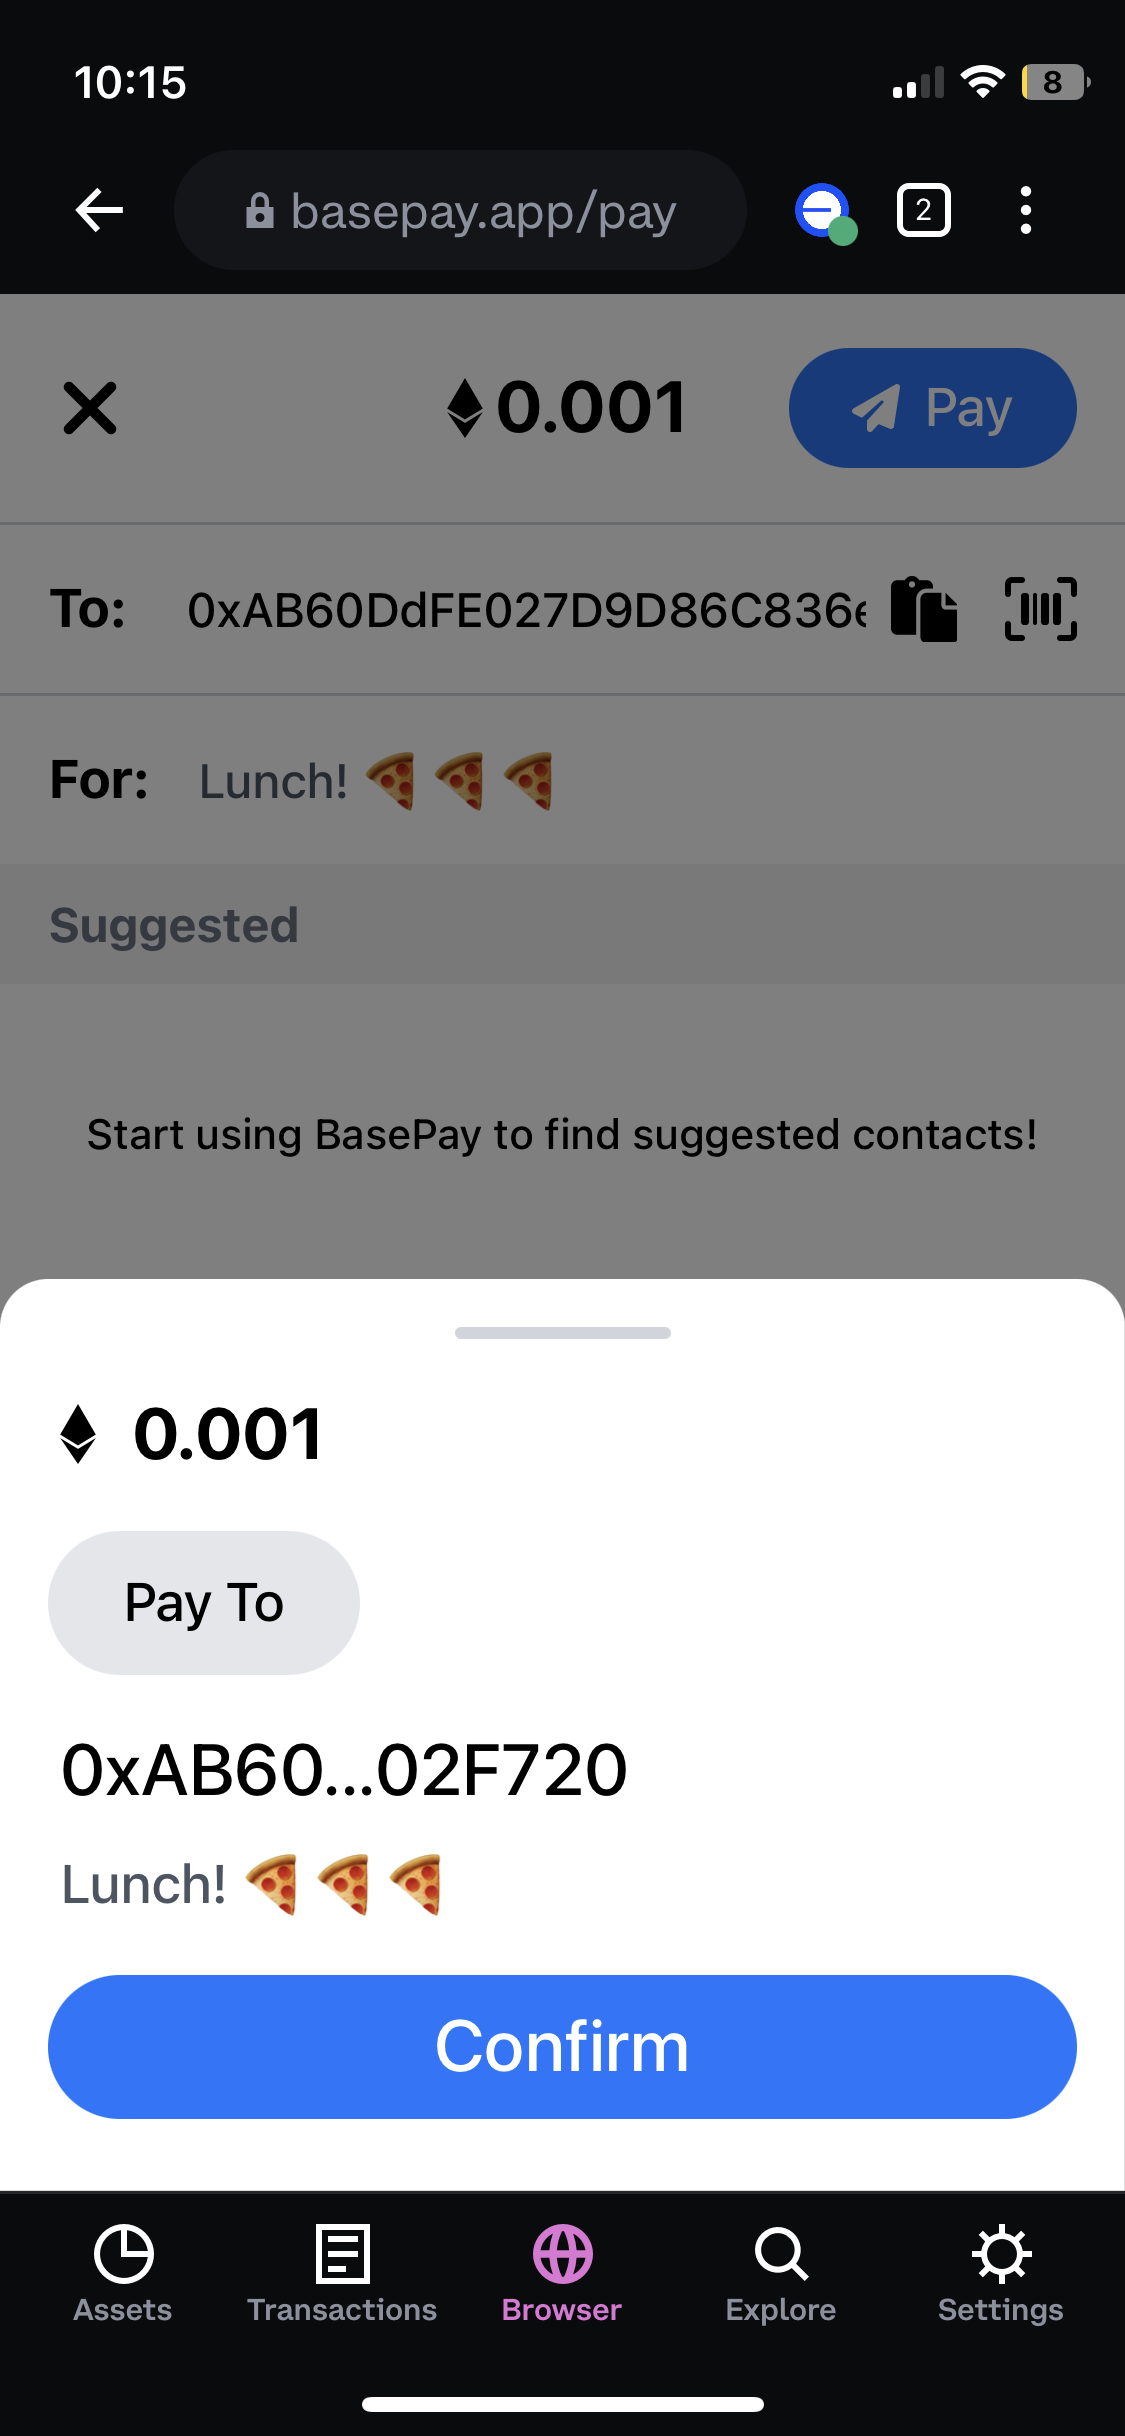
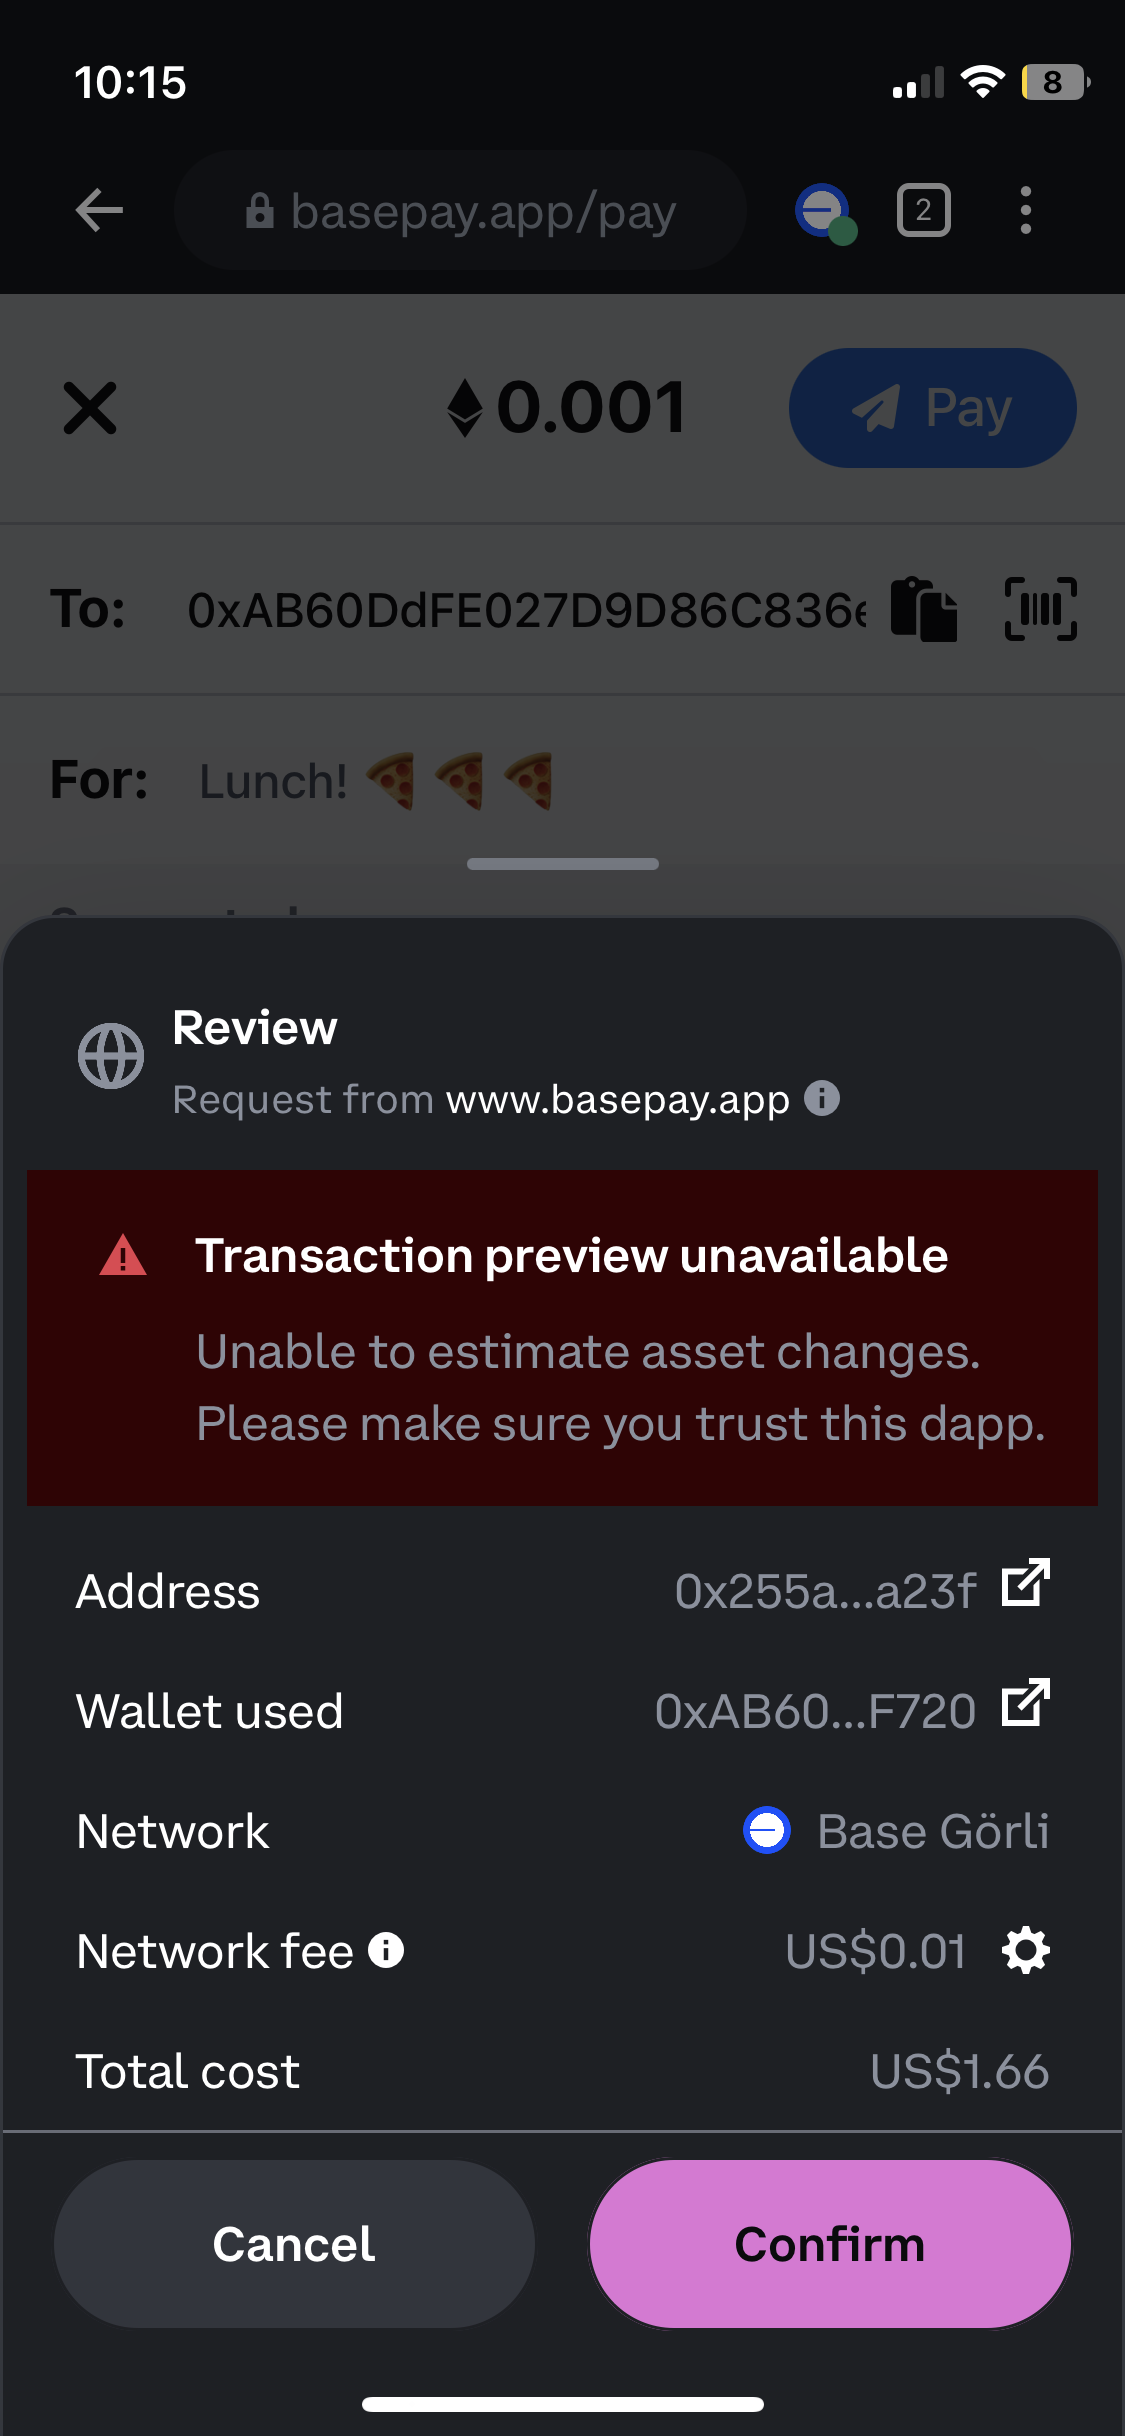
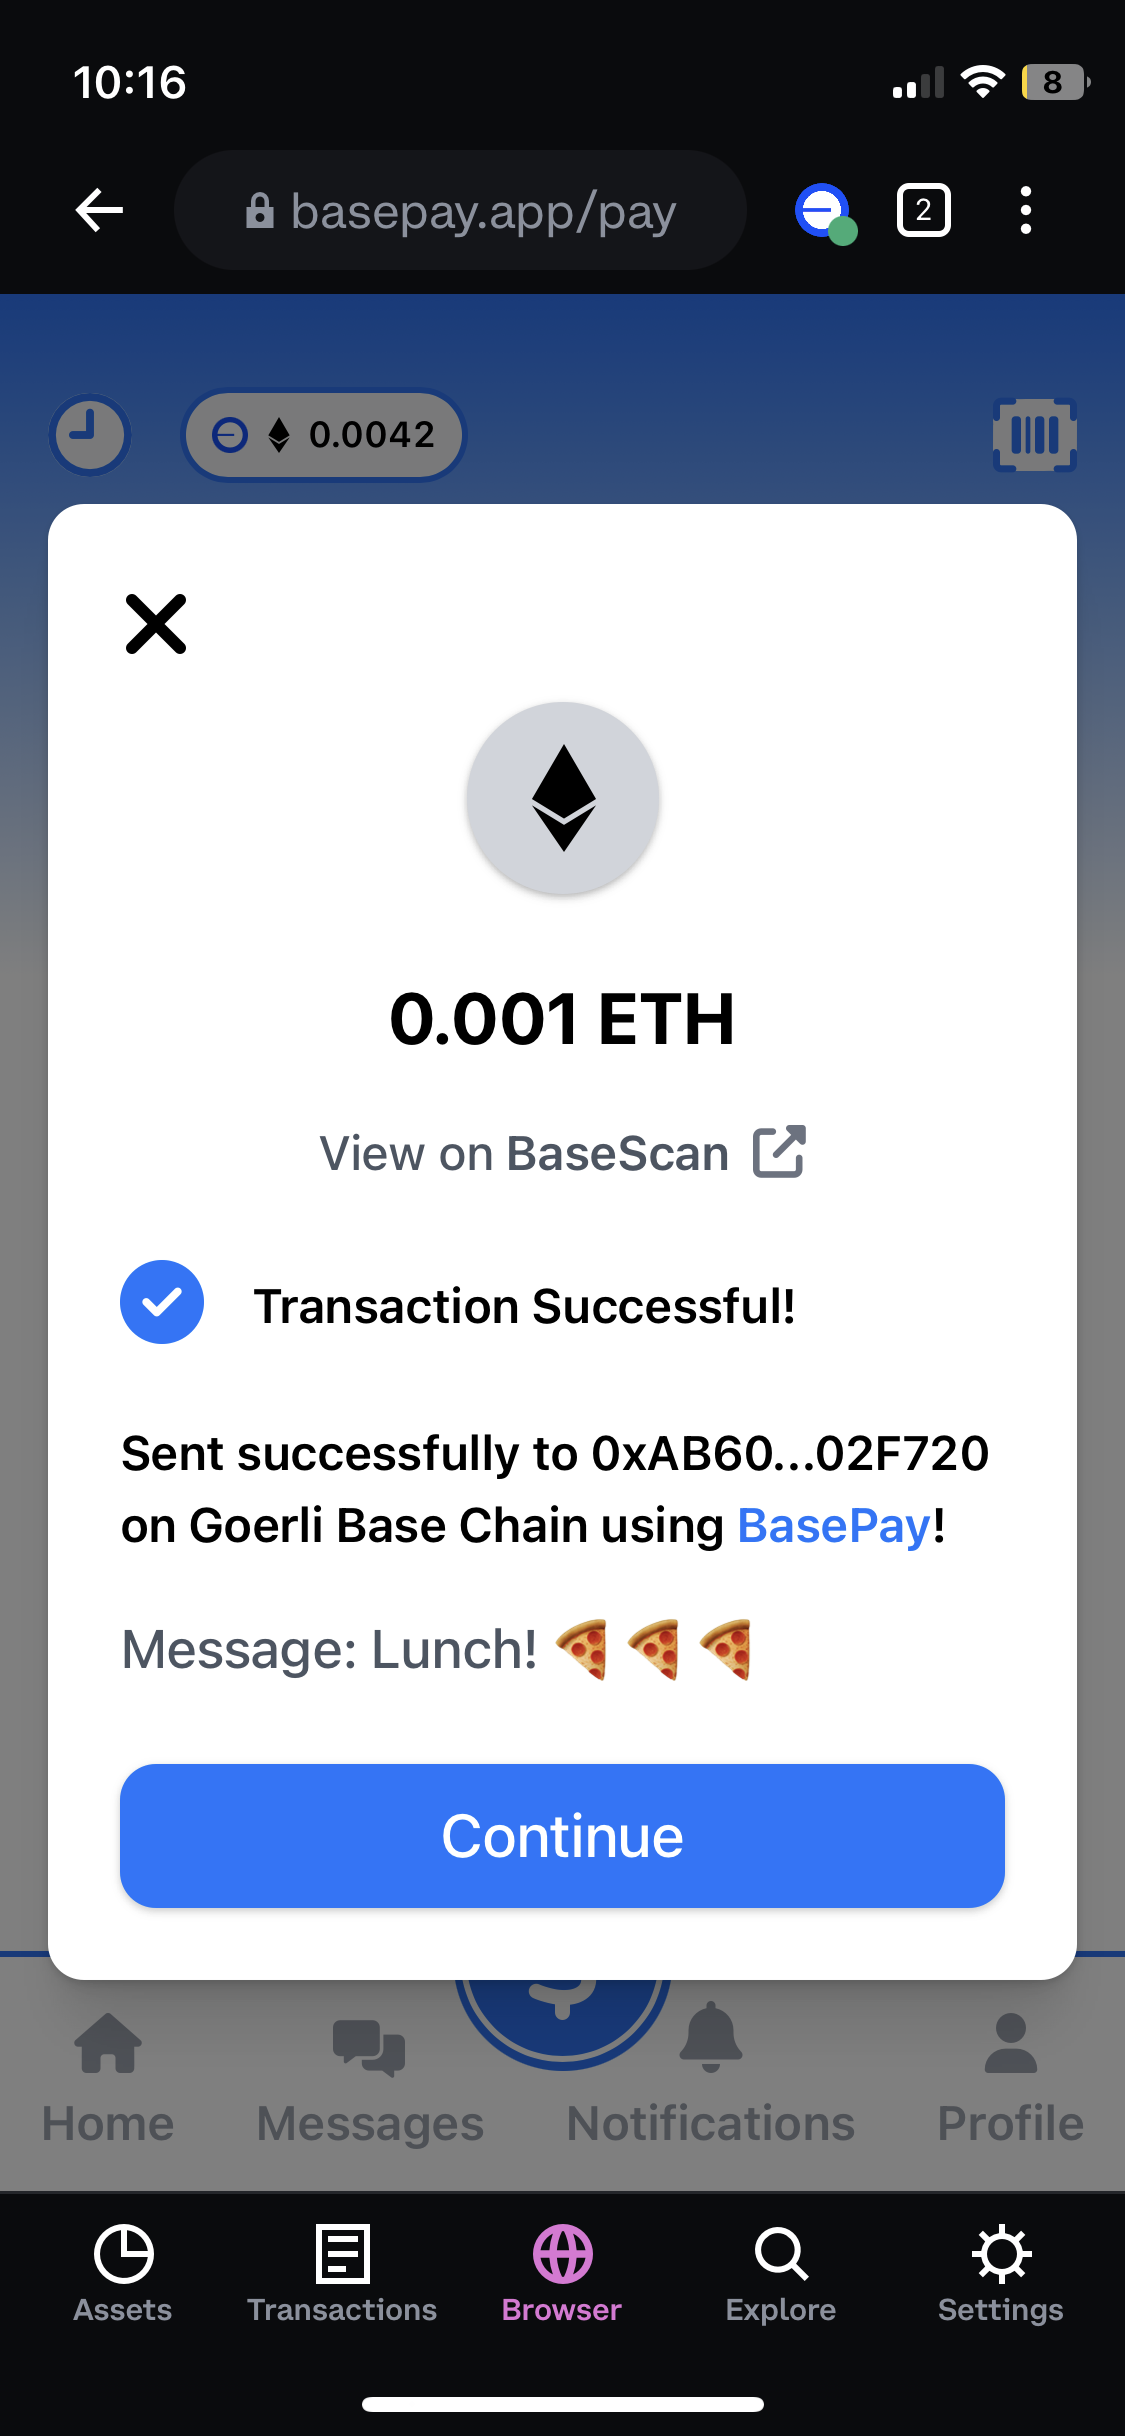
🔹 Direct Ether Transfer: The platform supports direct Ether transfers, allowing users to send cryptocurrency easily.
🔹 Initiate Payment Requests: Users can initiate payment requests without worrying about gas fees
🔹 Instant Chat Messaging: Stay connected with other users through an instant chat messaging system.
🔹 Initiate Payment Requests in Chat: Users can seamlessly initiate payment requests during chat conversations.
🔹 Direct Transfer in Chat: Conduct direct transfers within chat conversations for ultimate convenience.
🔹 Review Transaction History: View all transaction history within the app, including payments sent, received, requests sent, and requests received.
Whether you’re organizing a vacation or sharing lunch expenses, BasePay streamlines payments for all social situations, ensuring they’re more convenient than before.
Features
🔹 Connecting User’s Crypto Wallet: Users can connect their crypto wallets, including Coinbase Wallet and Metamask.
🔹 Direct Ether Transfer: The platform supports direct Ether transfers, allowing users to send cryptocurrency easily.
🔹 Initiate Payment Requests: Users can initiate payment requests without worrying about gas fees
🔹 Instant Chat Messaging: Stay connected with other users through an instant chat messaging system.
🔹 Initiate Payment Requests in Chat: Users can seamlessly initiate payment requests during chat conversations.
🔹 Direct Transfer in Chat: Conduct direct transfers within chat conversations for ultimate convenience.
🔹 Review Transaction History: View all transaction history within the app, including payments sent, received, requests sent, and requests received.
This job is based on setuptools and does the following:
builds the Python module
validates the module (eg. linter, tests)
deploys the module to a PyPI index
deploys the module as a Docker image to a Docker registry
Before using the pipeline please create a new variable group
with the name GitHub. This group contains variables required during the release/deploy
process.
Add the following variables to the group:
GH_TOKEN
The personal access token is used when pushing the version bump commits to the master branch during a release (see details below in Variables -> release). Change the variable type to secret.
GH_USER_MAIL
The email of the user assigned to the personal access token (GH_TOKEN).
The name of the user assigned to the personal access token.
Example: my-ci-user
Variables
release
The Python pipeline allows only on-demand releases. By default the project is only built and validated. If a new release of the Python module and Docker image
should be released a new build has to be queued.
In order to initiate a new release the variable release: true needs to be defined during the queuing. This will result in bumping the
version (snapshot->release) and result in a deployed PyPI package, a Docker image and two version commits.
dockerSnapshot
By default Docker images are built only during the release process. In case a snapshot image is needed one can queue a new build and set the variable
dockerSnapshot: true. This will result in building a Docker image with a snapshot version.
Parameters
dockerDeploy
Flag to enable/disable building and publishing a Docker image with the Python module.
Default: true
dockerDeployFile
Filename of the Dockerfile used for defining the content of the image to be pushed to the Docker registry.
Default: Dockerfile
dockerRegistryConnector
Azure DevOps service connector that defines the Docker registry where the Docker image should be pushed to.
Default: tomtom-docker-registry-bintray
dockerRepo
Name of the repository an image should be pushed to. Also called a namespace in Docker terminology.
A Docker image with a Python module will be called <dockerRepo>/<name-of-module>.
Default: python
pypiConnector
Azure DevOps service connector that defines the PyPI index (eg. pypi.org) where PyPi modules should be deployed to.
Default: testpypi-tomtom-dev
pythonDeployVersion
The Python version used for creating the source distribution package deployed to the specified PyPI index.
Default: 3.6
pythonTestVersions
Specify the Python versions to be used in all jobs other than deploy (which uses just pythonDeployVersion).
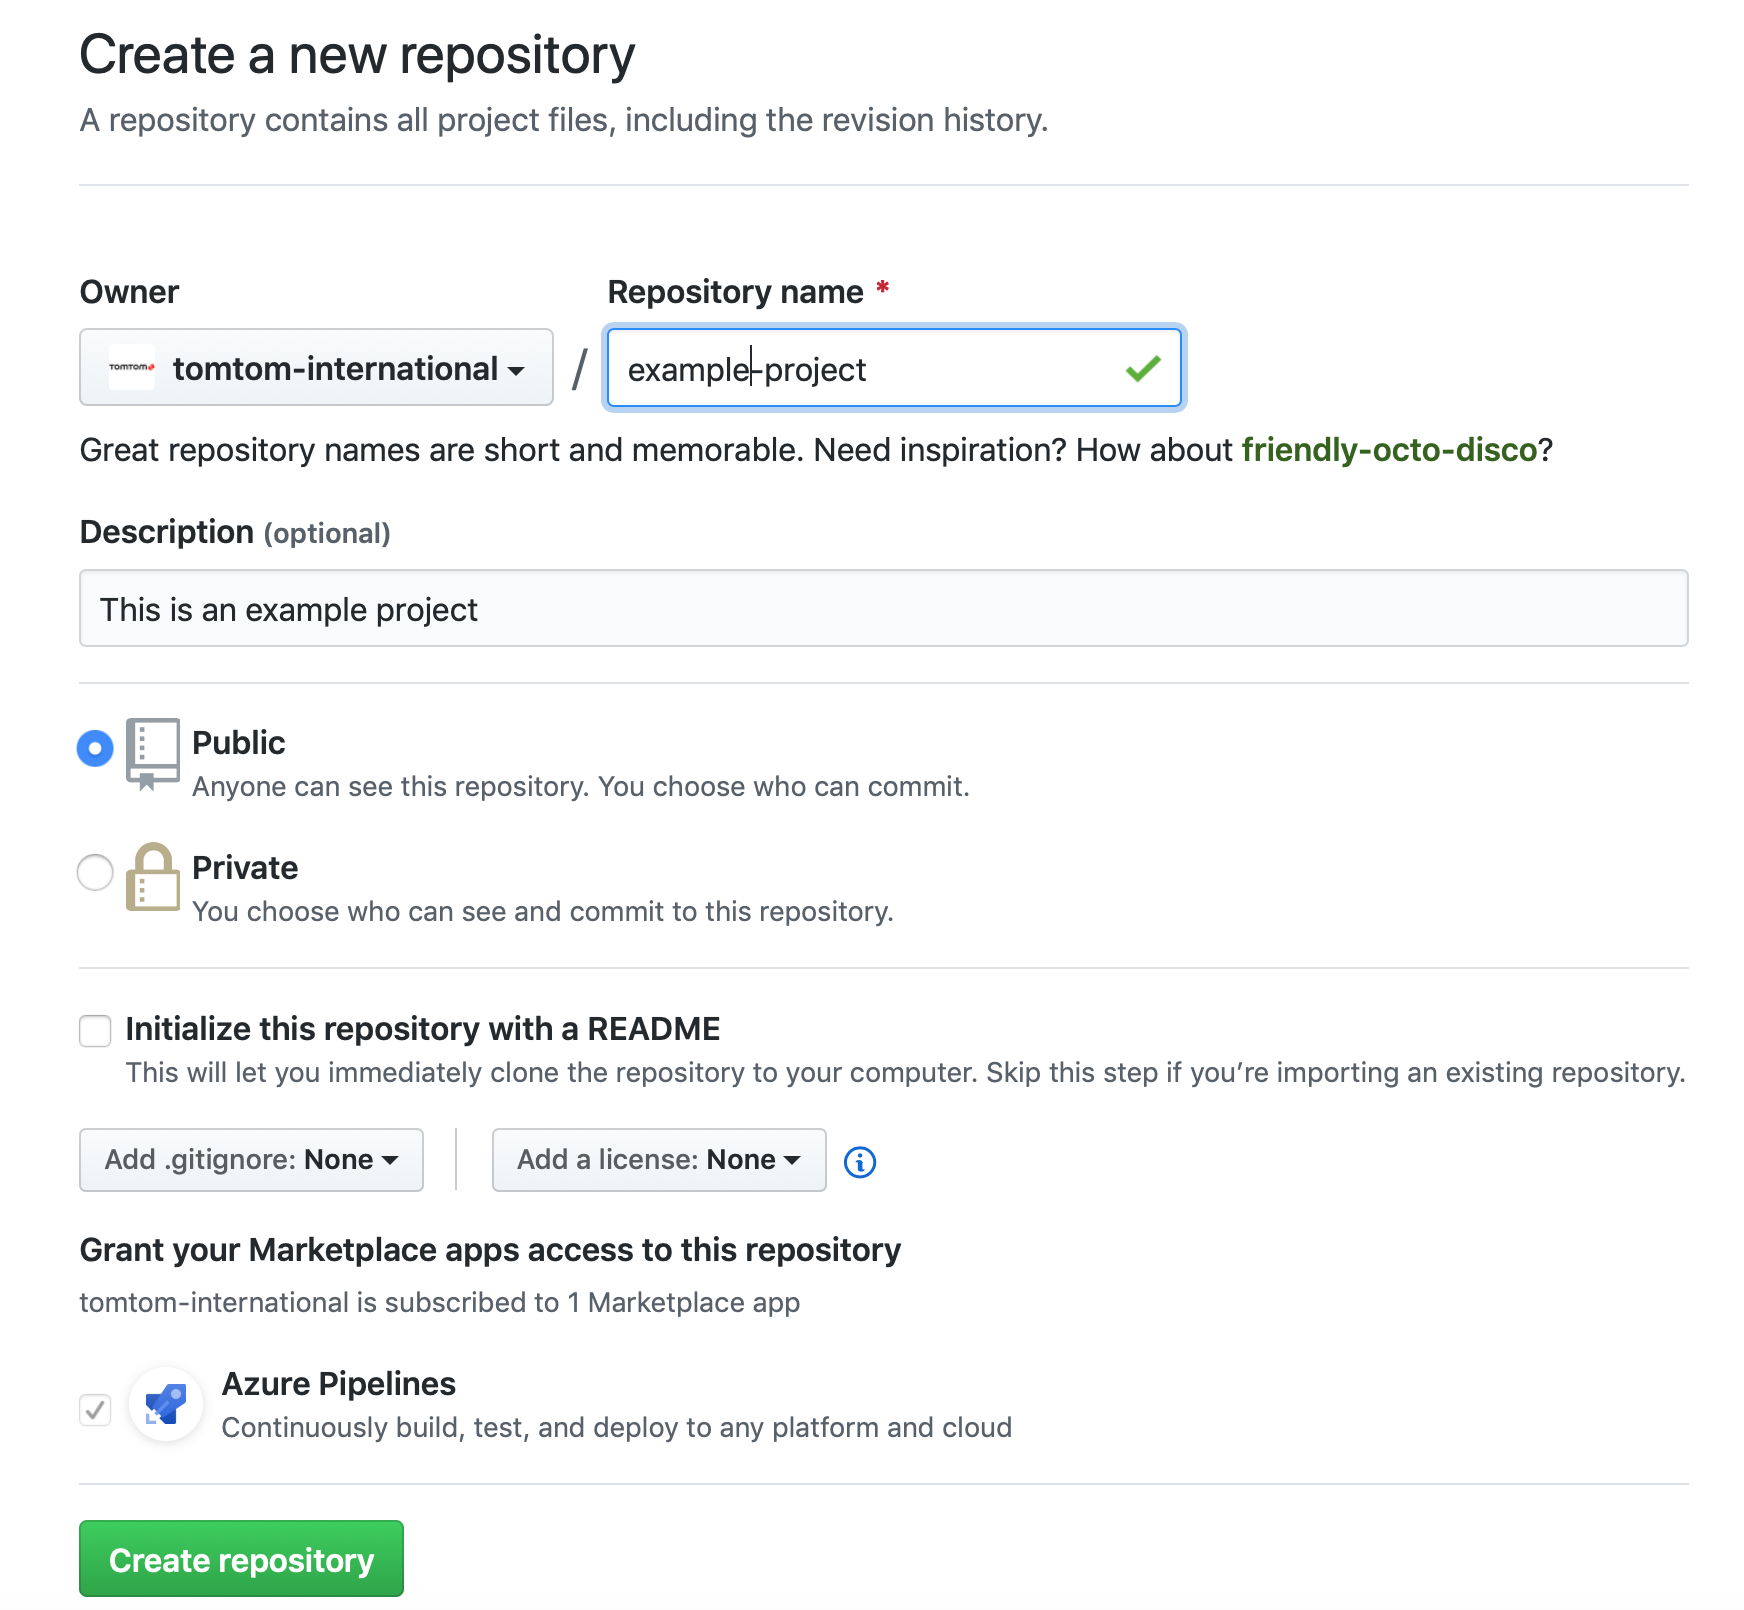
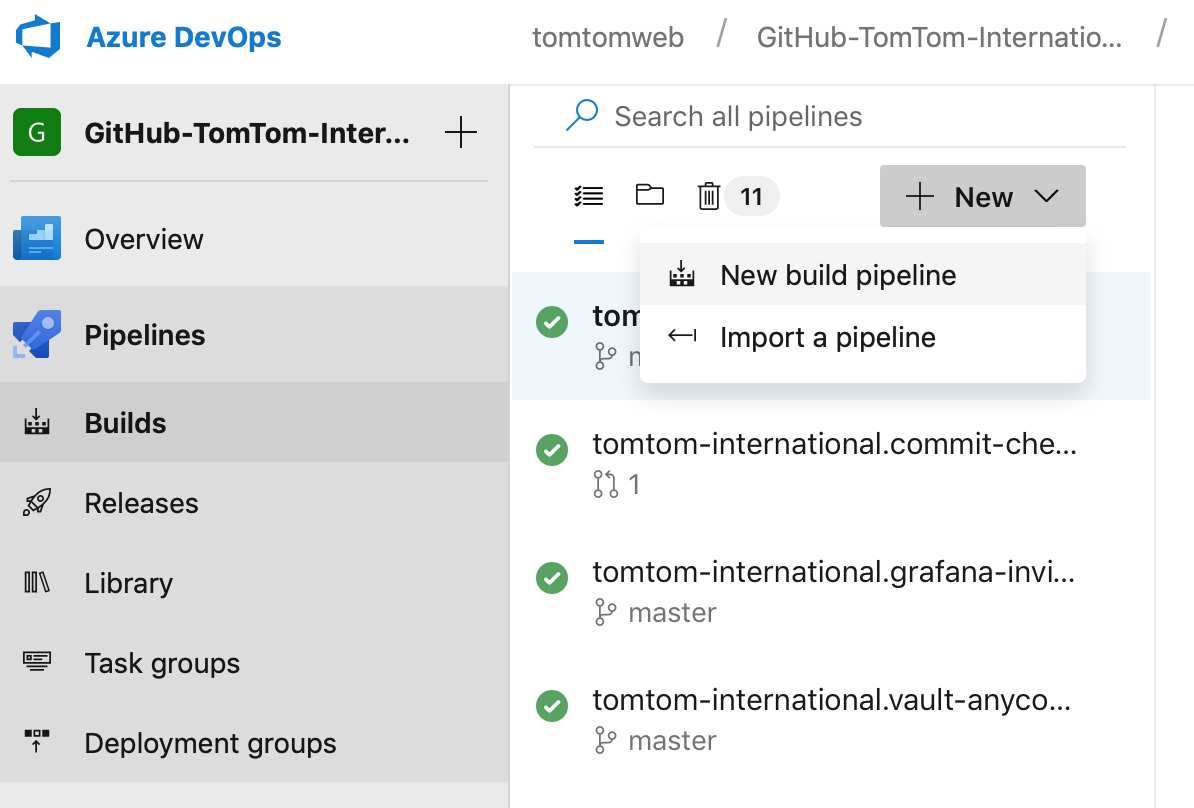
This step-by-step guide shows how to make use of Azure Pipelines and these templates in your own project. It shows you how to create a Python project and use the Python template job from this repository.
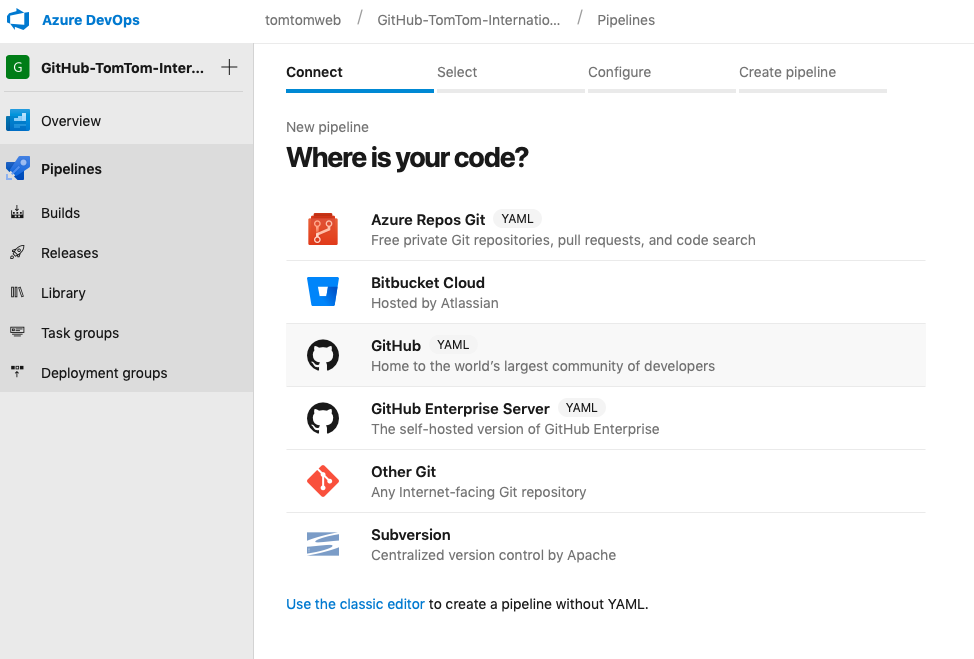
Create a new build pipeline for the newly created repository
Select Github:
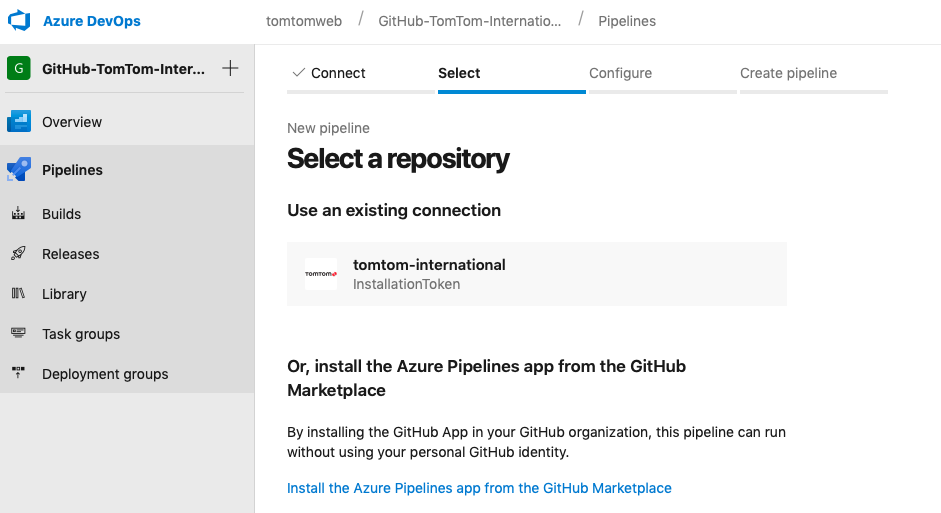
Scroll down to the bottom of the list and click on the connection link (Search for ‘You may also select a connection‘):
Select the service connection for your GitHub account/organization (A detailed description on how to create service connections can be found in the official Azure Devops documentation)
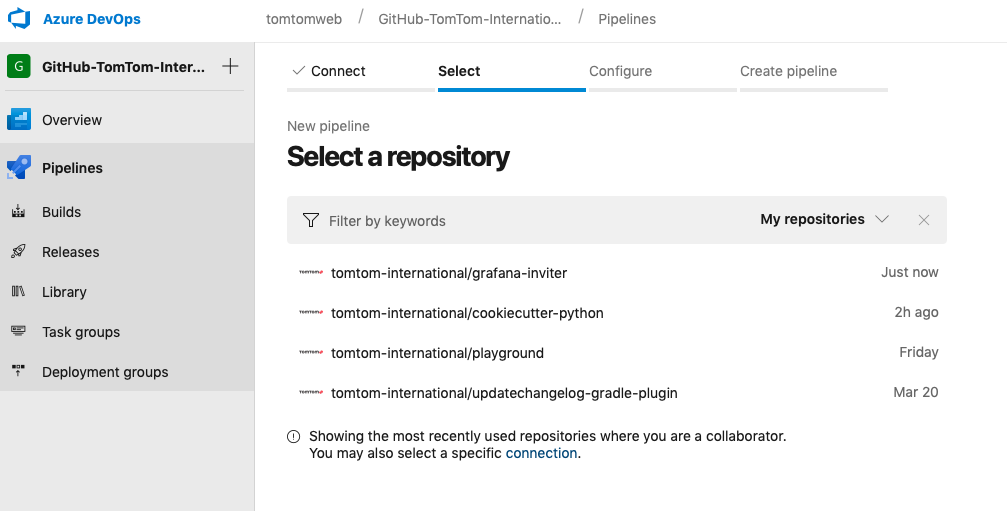
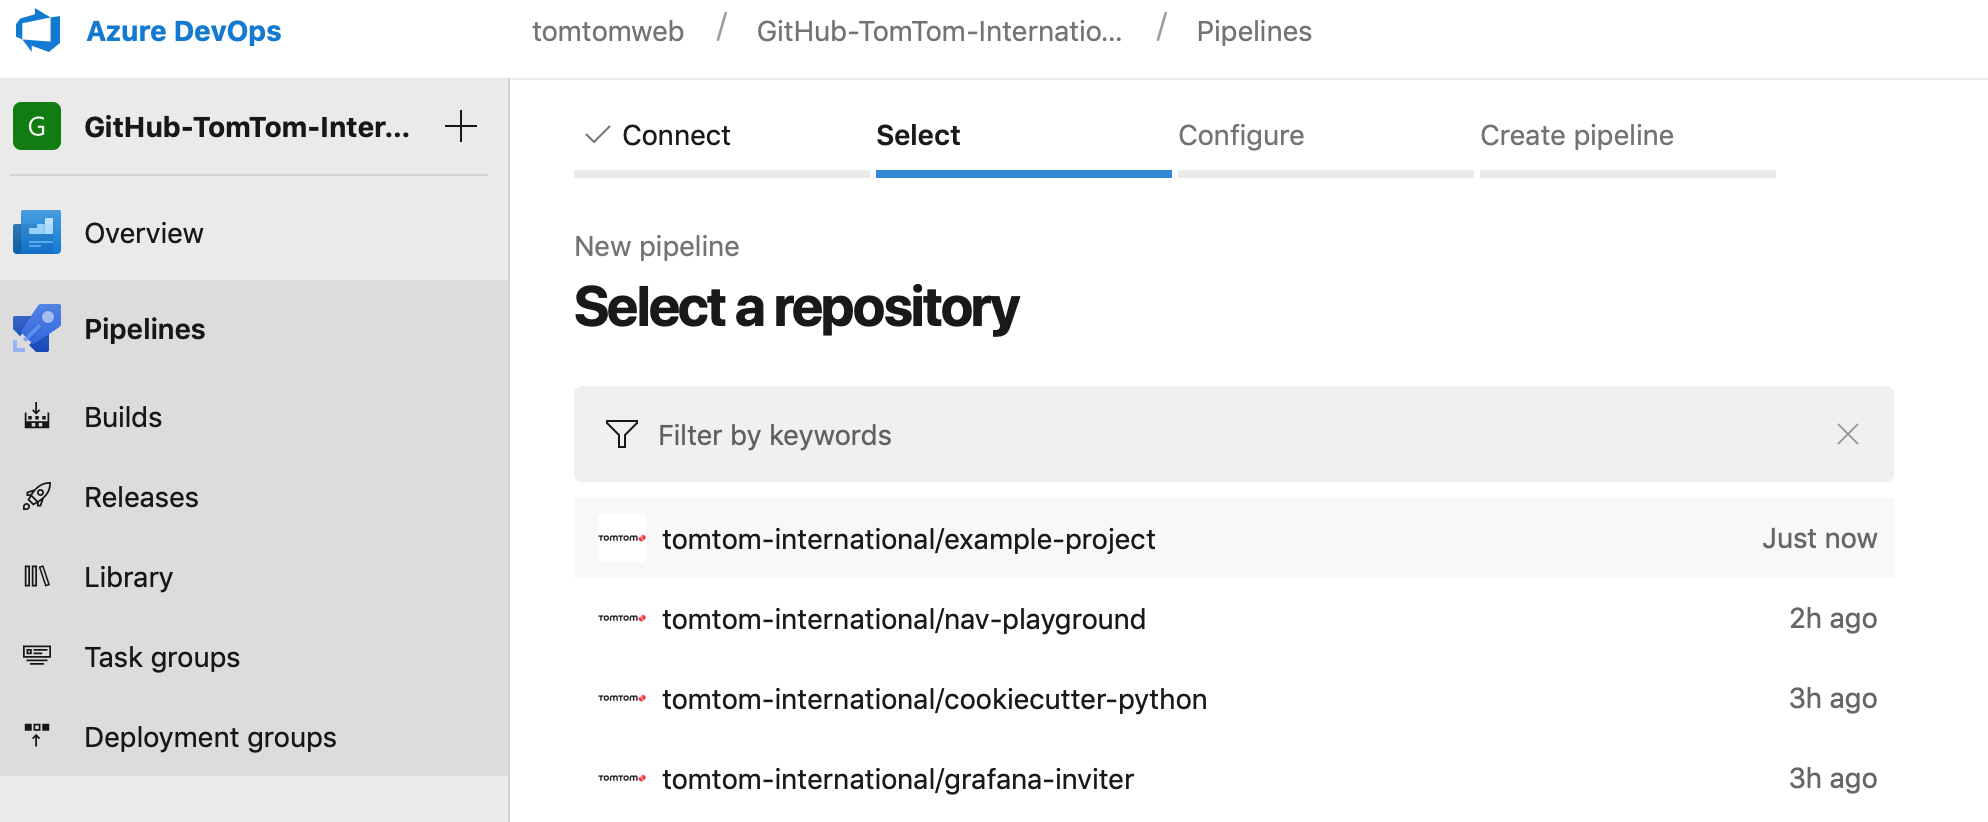
Select the newly created repository:
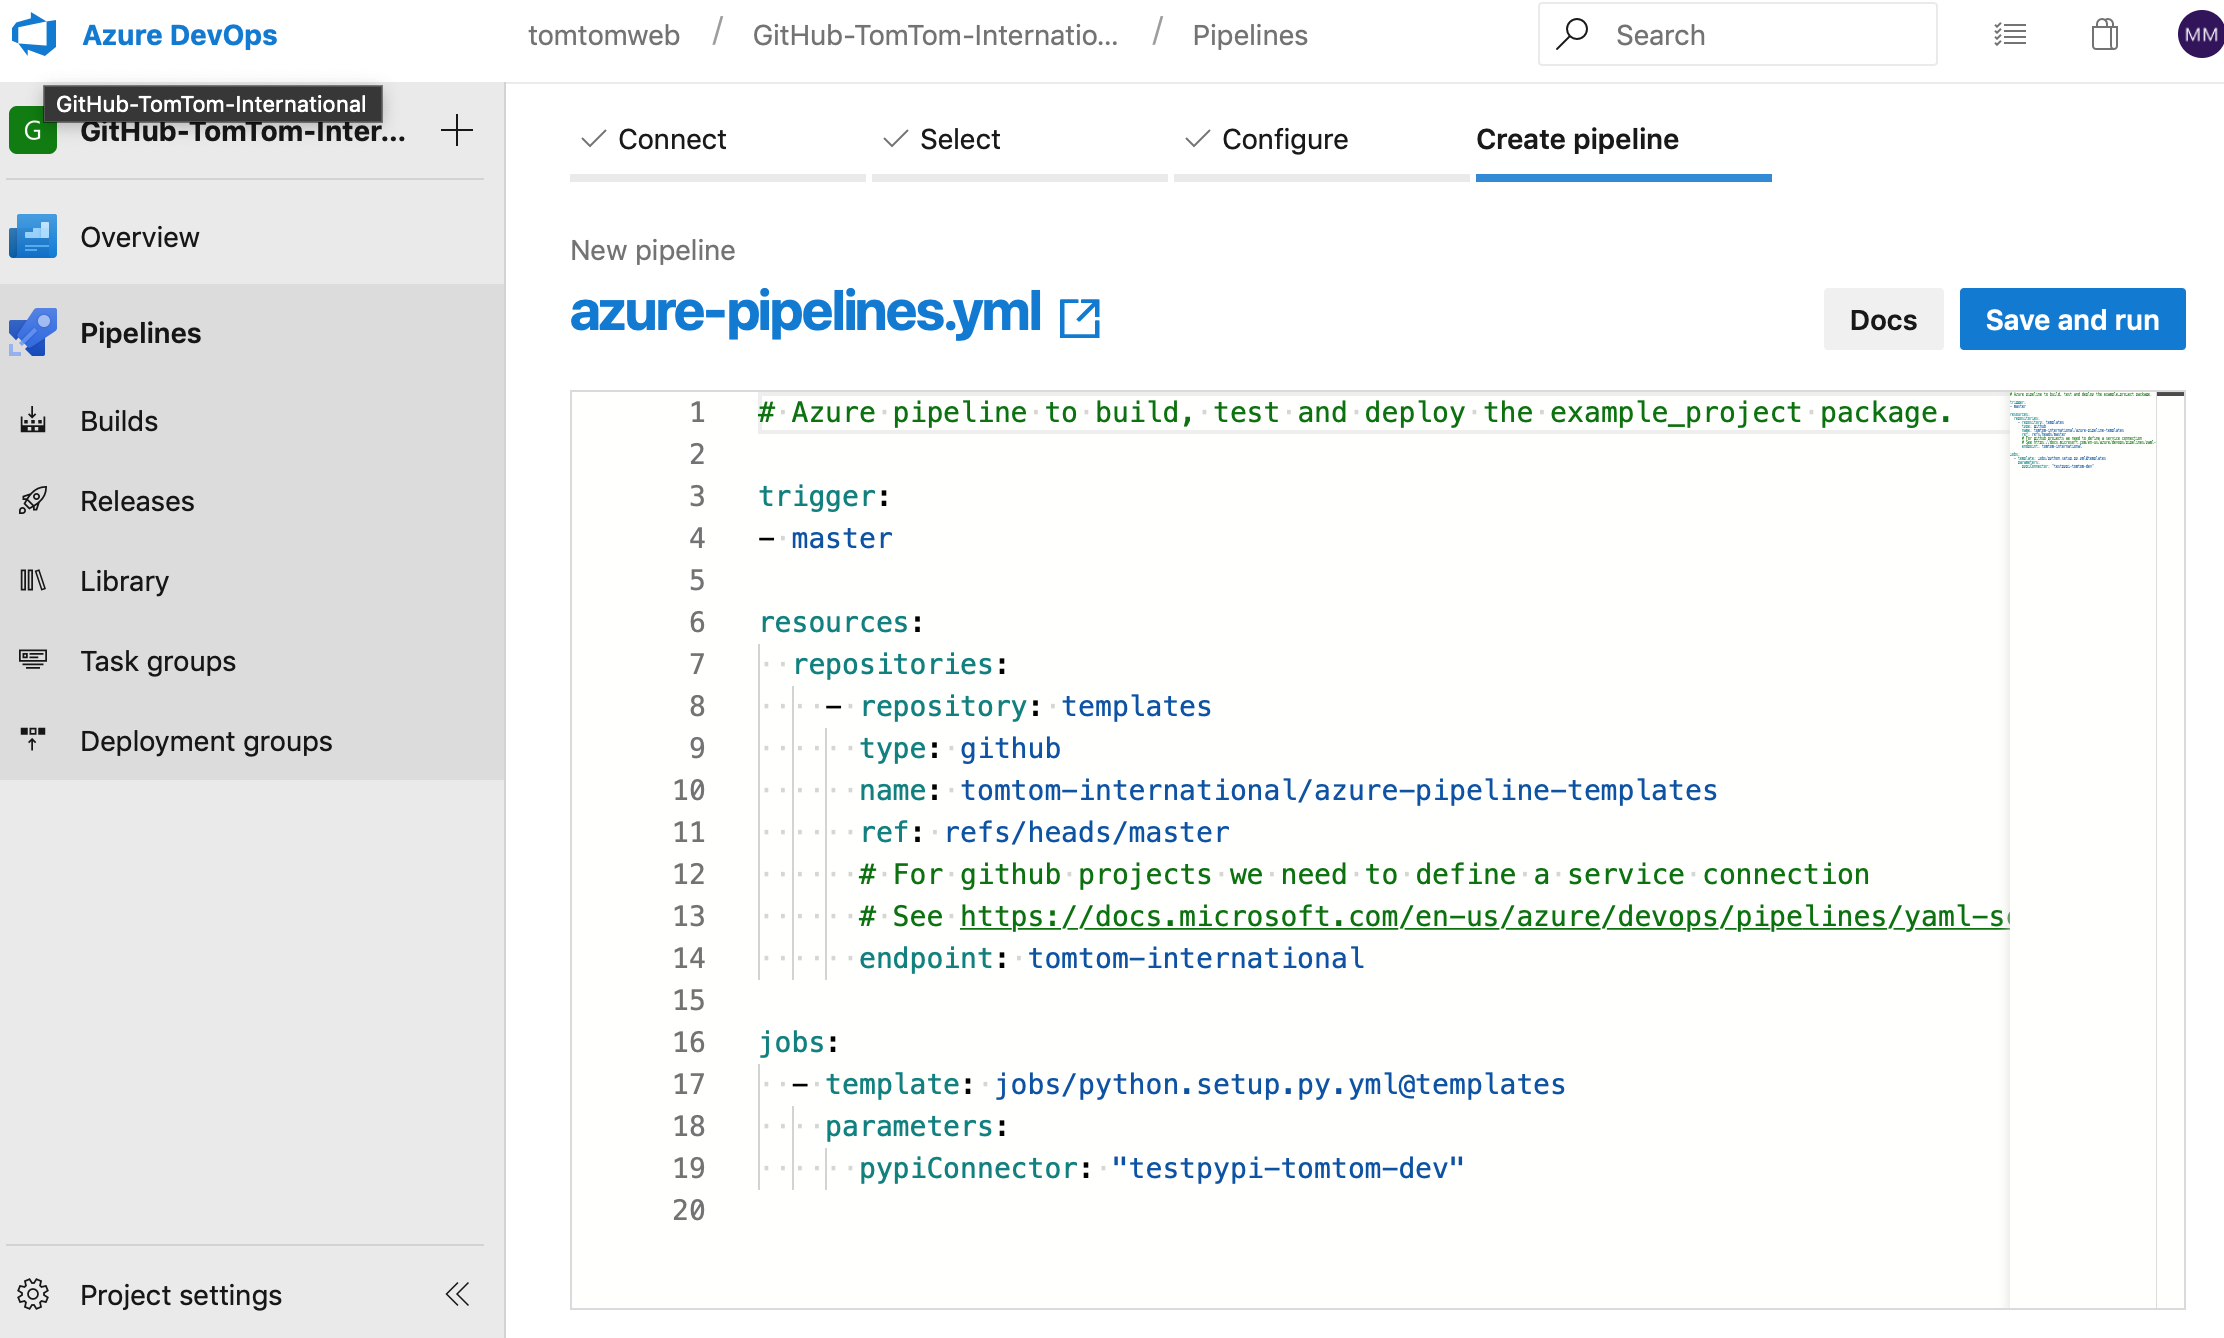
Click on Run or Save and run.. to trigger the first build and wait until the build finishes to see the results:
This job is based on setuptools and does the following:
builds the Python module
validates the module (eg. linter, tests)
deploys the module to a PyPI index
deploys the module as a Docker image to a Docker registry
Before using the pipeline please create a new variable group
with the name GitHub. This group contains variables required during the release/deploy
process.
Add the following variables to the group:
GH_TOKEN
The personal access token is used when pushing the version bump commits to the master branch during a release (see details below in Variables -> release). Change the variable type to secret.
GH_USER_MAIL
The email of the user assigned to the personal access token (GH_TOKEN).
The name of the user assigned to the personal access token.
Example: my-ci-user
Variables
release
The Python pipeline allows only on-demand releases. By default the project is only built and validated. If a new release of the Python module and Docker image
should be released a new build has to be queued.
In order to initiate a new release the variable release: true needs to be defined during the queuing. This will result in bumping the
version (snapshot->release) and result in a deployed PyPI package, a Docker image and two version commits.
dockerSnapshot
By default Docker images are built only during the release process. In case a snapshot image is needed one can queue a new build and set the variable
dockerSnapshot: true. This will result in building a Docker image with a snapshot version.
Parameters
dockerDeploy
Flag to enable/disable building and publishing a Docker image with the Python module.
Default: true
dockerDeployFile
Filename of the Dockerfile used for defining the content of the image to be pushed to the Docker registry.
Default: Dockerfile
dockerRegistryConnector
Azure DevOps service connector that defines the Docker registry where the Docker image should be pushed to.
Default: tomtom-docker-registry-bintray
dockerRepo
Name of the repository an image should be pushed to. Also called a namespace in Docker terminology.
A Docker image with a Python module will be called <dockerRepo>/<name-of-module>.
Default: python
pypiConnector
Azure DevOps service connector that defines the PyPI index (eg. pypi.org) where PyPi modules should be deployed to.
Default: testpypi-tomtom-dev
pythonDeployVersion
The Python version used for creating the source distribution package deployed to the specified PyPI index.
Default: 3.6
pythonTestVersions
Specify the Python versions to be used in all jobs other than deploy (which uses just pythonDeployVersion).
This step-by-step guide shows how to make use of Azure Pipelines and these templates in your own project. It shows you how to create a Python project and use the Python template job from this repository.
Create a new build pipeline for the newly created repository
Select Github:
Scroll down to the bottom of the list and click on the connection link (Search for ‘You may also select a connection‘):
Select the service connection for your GitHub account/organization (A detailed description on how to create service connections can be found in the official Azure Devops documentation)
Select the newly created repository:
Click on Run or Save and run.. to trigger the first build and wait until the build finishes to see the results:
Clone this repo to your local machine using https://github.com/LiuSirui99/Google_map.git
Task Description
The size of the website should be min. 1024x768 pixels.
Theme to be represented on the maps: Free

The task is divided into three parts:

- 1st part: Making an image map
- 2nd part: Making a map using Google Fusion Tables or Google My Maps
- 3rd part: making the website
Notes
Image map:
If you convert a map from vector format to raster, do not forget that the color model should be RGB, because the map will be presented on monitors.
You should determine the size of your image map before making it, considering the size of oyur website and the space that you have selected to show the image map. If you made the image map, you cannot change its size, because in that case the coordinates determined for each clickable area will not match their new position in the new size. If you change the size, you should make again the image map.
In Google My Maps, do not forget to use „Set default view” to save the current size of your map. In other case, the application will show the map in an arbitrary size.
The map made using one of these applications should be embedded to your website, using the HTML code given by the application. Before copying the HTML code, verify the size of the map, because you can change it if needed.
Do not forget to make public your map before sending the link…
Website:
The design of the pages within our website should be uniform, that is: use the same (or at least similar) font types, sizes, colours, backgrounds, etc.
The starting page should remain accessible from any page of our website (e.g. using an always visible link)
Contributing
To get started…
Step 1
Option 1
🍴 Fork this repo!
Option 2
👯 Clone this repo to your local machine using https://github.com/LiuSirui99/Google_map.git
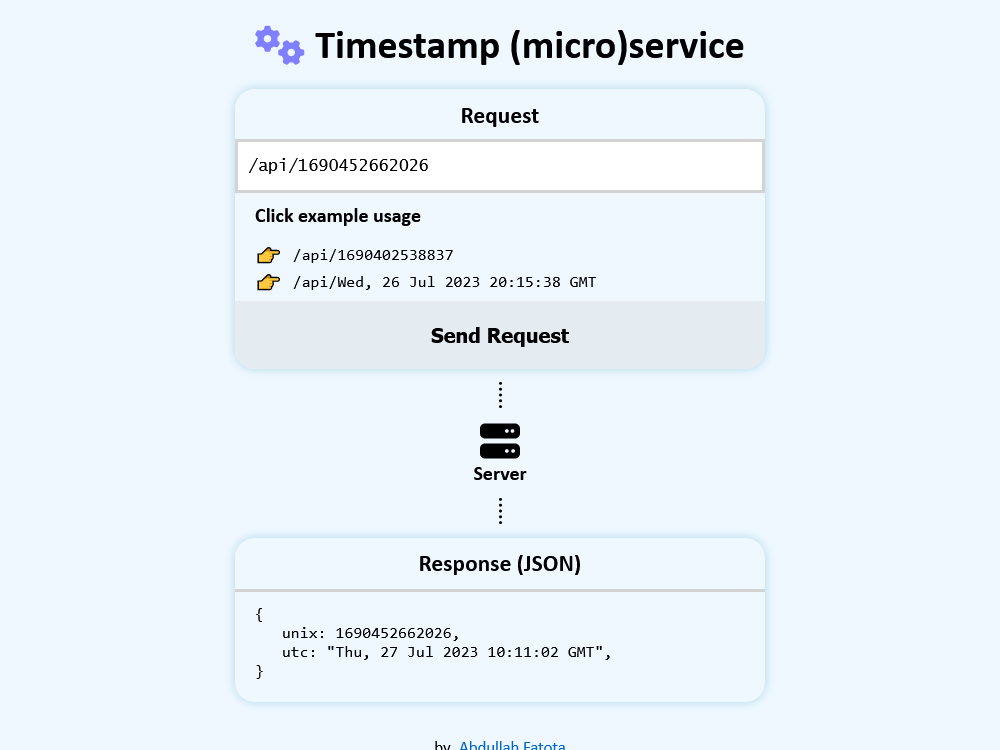


 https://github.com/new-AF/timestamp-microservice